Just imagine that you are working in a hospital many decades ago. This section will discuss the following equipment that you may find during your historical shift. Please scroll down and start reading.
- Oxygen spectacles
- Schimmelbusch mask
- Clover inhaler
- Magill Apparatus (anaesthetic machine)
- Magill Laryngoscope
- Beaver Respirator
- Carbon dioxide monitor
- Future anaesthesia machine
Tudor Edwards nasal oxygen spectacles
As you begin your hospital shift in the past, you decide to visit some patients in the ward. To your amazement, you observe that some patients are wearing mysterious spectacles without lenses in them!
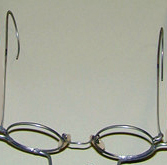
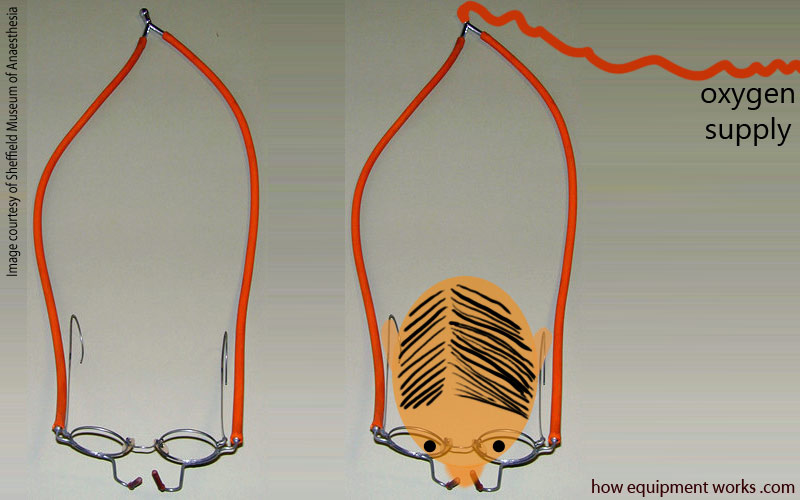
You discover that these “eyeglasses” have nothing to do with vision. Instead, they were used to support the oxygen tubing that supplied nasal oxygen. On the left is a museum picture of such a device and on the right I have drawn a face and some more oxygen tubing to show how it was used. These oxygen spectacles were invented by Arthur Tudor Edwards (1890-1946), who was a famous thoracic surgeon.
I suppose, if the patient actually needed reading glasses, he would have had to choose between having “oxygen spectacles” or “reading spectacles”.
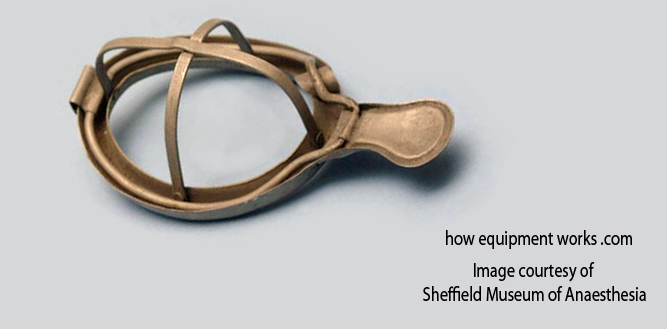
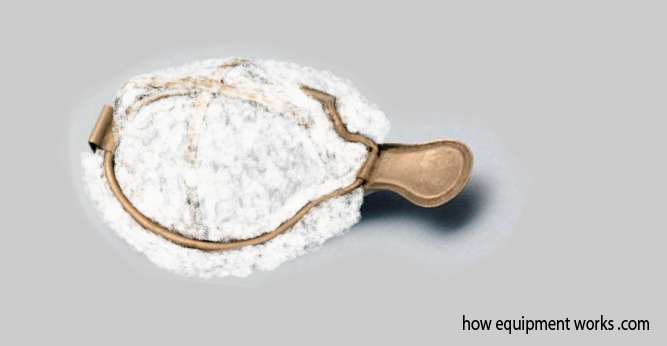
Schimmelbusch mask
You are in the operating room and you are about to anaesthetise a patient. You ask for an anaesthetic machine, and instead, they give you a cloth!

Then you are given a “Schimmelbusch mask” invented by Curt Schimmelbusch (1860 – 1895). This is a metal framed mask that was developed around 1890. Here is a museum picture of such a mask.
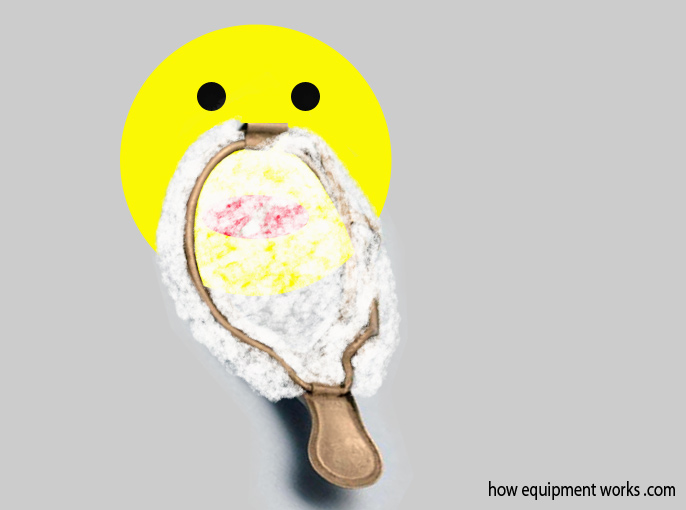
I will now tell you how to use it. Take the cloth and set it onto the mask as shown below.
Now put the mask on the patient’s face.
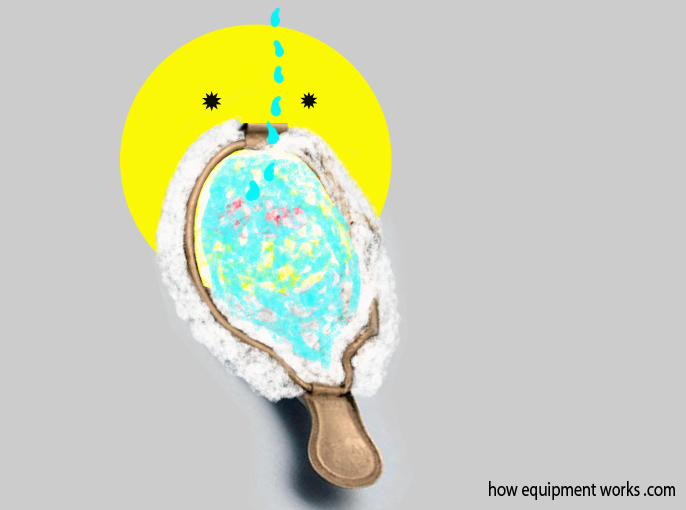
Take some anaesthetic agent (e.g. ether or chloroform) and carefully pour drops of it onto the cloth. As the patient breathes through the cloth, the anaesthetic agent on it will vaporise and put the patient to sleep. I suppose you cannot find a simpler piece of equipment!
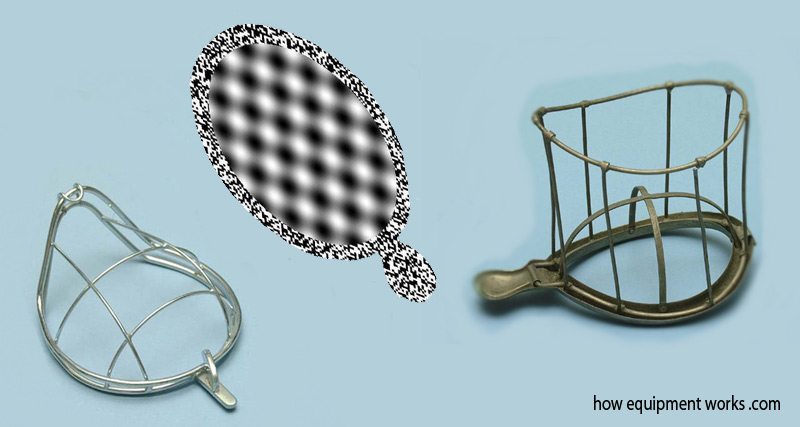
There were variations of this type of mask as shown below:
(I am sure that you have noticed that the one in the middle is not real. It is an optical illusion that makes you “see” vapour vaporising from the mask !)
Clover’s inhaler with Hewitt Stopcock
You don’t like the Schimmelbusch mask because it makes you more sleepy than the patient. You request something better, so you have now been given a Clover ether inhaler (invented by Dr. Joseph Clover 1825 – 1882). It is lightweight and convenient. You fill the metal chamber with ether and place the face mask onto the patient’s face. The patient breathes in and out, becoming anaesthetised in about two minutes. (Note: I have drawn a bag and “face” onto the original museum photograph to make things clearer). You are happy that your patient is well anaesthetised.

Let me explain how the Clover Ether Inhaler works. The liquid anaesthetic agent, in this case, “ether” (though shown below as a yellow liquid, it is actually colourless), is filled into the chamber. The lower end of the sphere is surrounded by water (shown in blue) to minimise the temperature drop during vaporisation. The patient breathes in and out through the brown mask. The back-and-forth breaths pass through the ether chamber and make the black bag expand and contract. As the breaths pass through the chamber it collects vaporised ether (yellow dots). The patient becomes anaesthetised as the vaporised ether is inhaled.
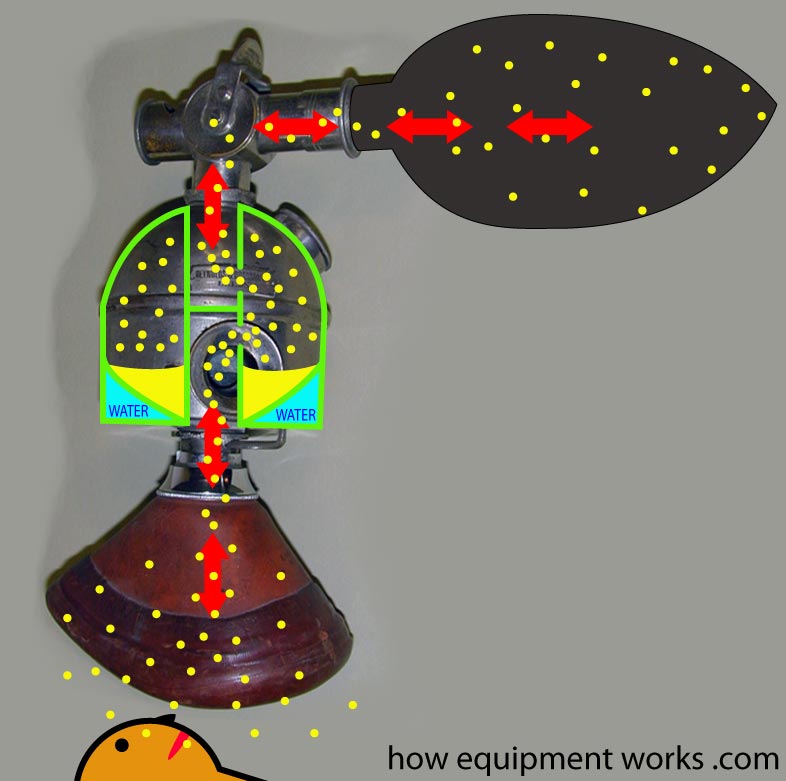
In this version of the device, there is a hole and a “tap” at the top (blue arrows). This design addition was made by a guy called Frederick Hewitt (1857-1916), and it allowed some fresh air to enter the system if so desired. However, this does not allow much fresh air (oxygen) to be taken in nor is there an effective way for carbon dioxide to escape. So the patient “re-breathes” quite a lot. Your happiness is interrupted when you find that your patient is quite blue.


Do you work in the anaesthetic team? If you do, please visit the free website below, which has anaesthesia-related fun and safety material. Click the button below to visit.

Magill Anaesthesia Apparatus (anaesthetic machine)
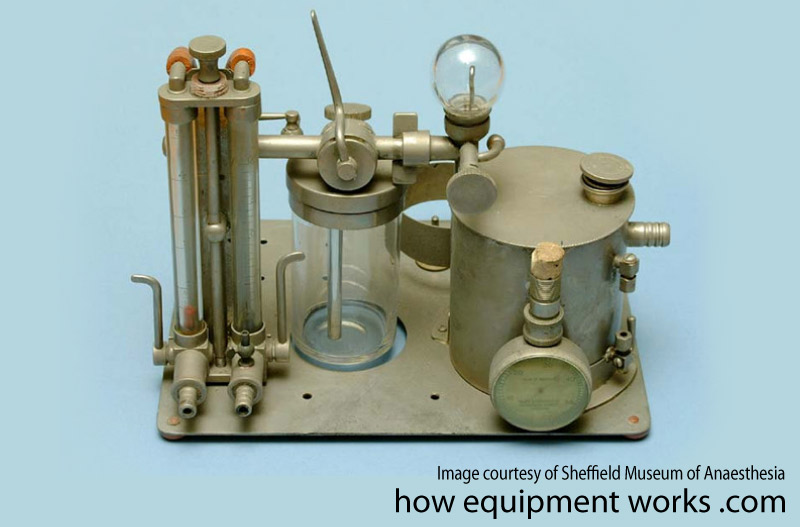
After you complain to your boss that the Clover inhaler you were given earlier is too “basic”, you are given something more complex to work with. So in your next surgical list, you are given a “Magill Anaesthesia Apparatus”. This is an “anaesthetic machine” invented by Ivan Magill (1888 – 1986) around the late 1920s to provide an anaesthetic agent to the patient.
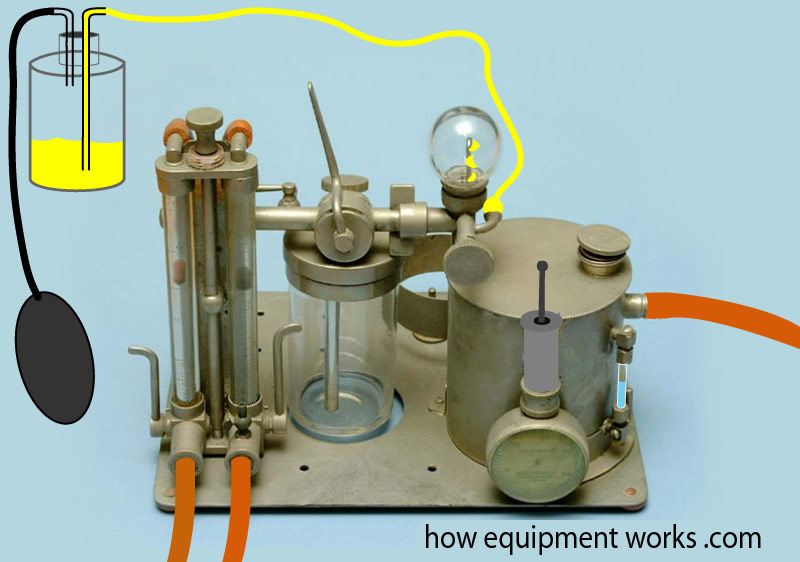
Below is a museum image of the machine.
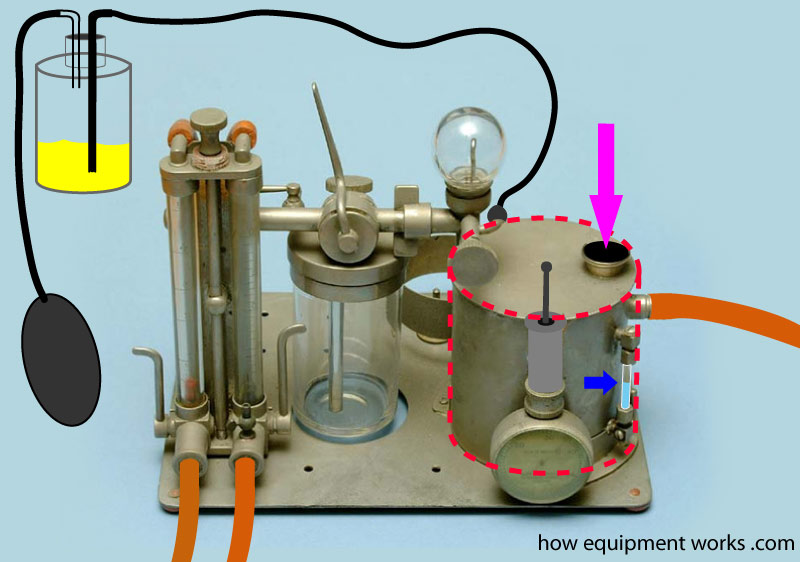
However, the above museum image is not complete. Let us make some additions and connections so that you can use this machine.
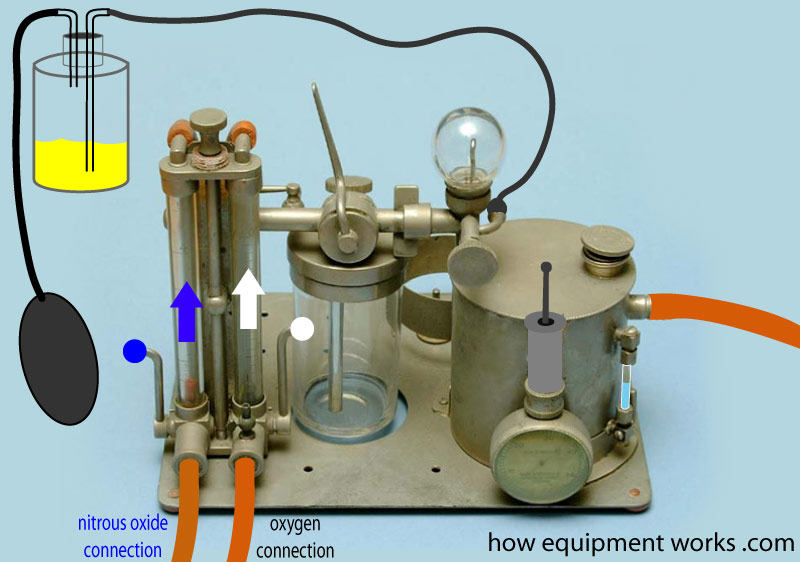
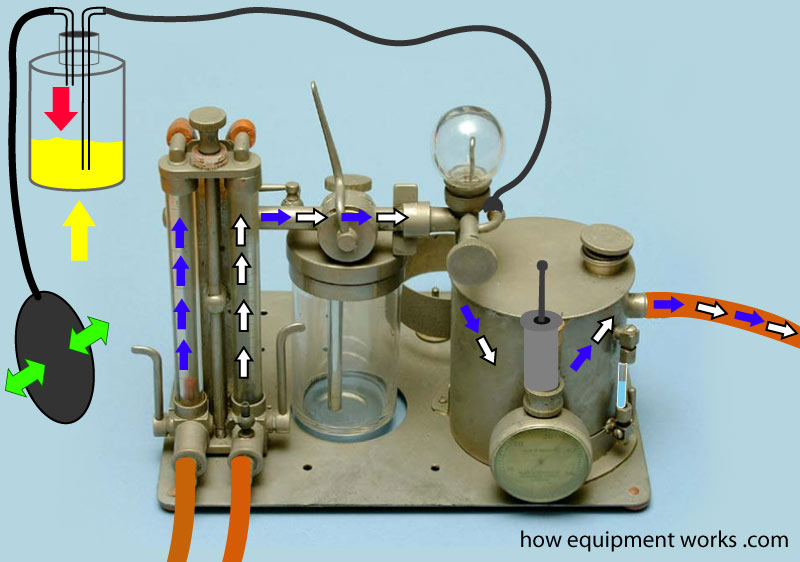
Let us first connect some tubes. We connect one hose (blue arrow) to a source of nitrous oxide source. Similarly, we connect another hose (white arrow) to a source of oxygen. The working of the machine will be explained to you later. For now, I am only telling you about the connections. The fresh gas flow that ultimately goes to the patient emerges from the “common gas outlet” (green arrow), and to this, we connect a hose that goes to the patient.
Next, we need to fill the machine with an anaesthetic agent. This machine can use ether and/or chloroform. The ether is filled into a bottle (yellow arrow). As will be explained to you later, this bottle can be pressurised. This machine can also use the anaesthetic agent chloroform and this would normally be filled into the chloroform bottle (red arrow). However, today we will use only ether, so this bottle will be kept empty.
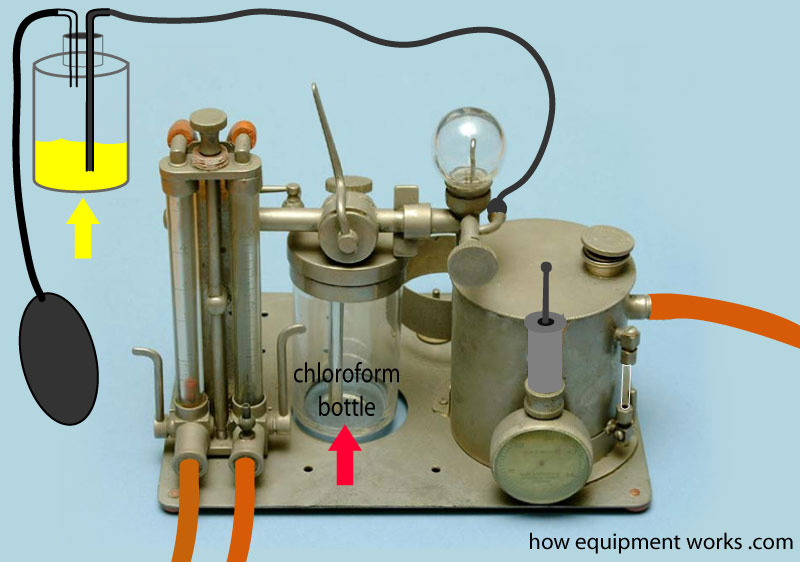
The machine has a way to warm the ether being delivered to the patient. This is achieved in a warming chamber (red dashed outline) that is warmed using hot water.
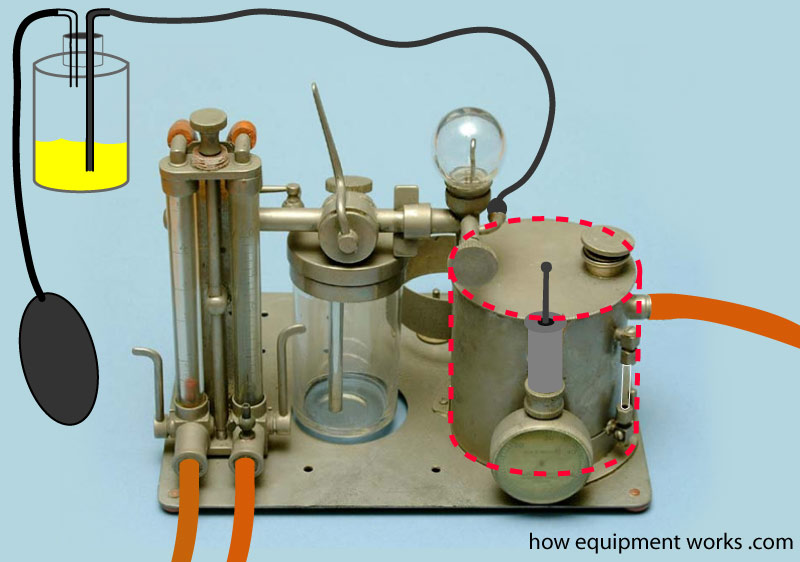
Let us prepare this warming chamber. We first boil a kettle of water and use some of the water to make a cup of tea (or instant coffee).
From the kettle, we pour some warm water into the warming chamber through its filling hole (pink arrow). The level gauge (glass tube, blue arrow) shows the water level inside.
You now start the anaesthetic gases. You do this by moving the oxygen lever (white dot) and the nitrous oxide lever (blue dot). The flow meter bobbins will move upwards.
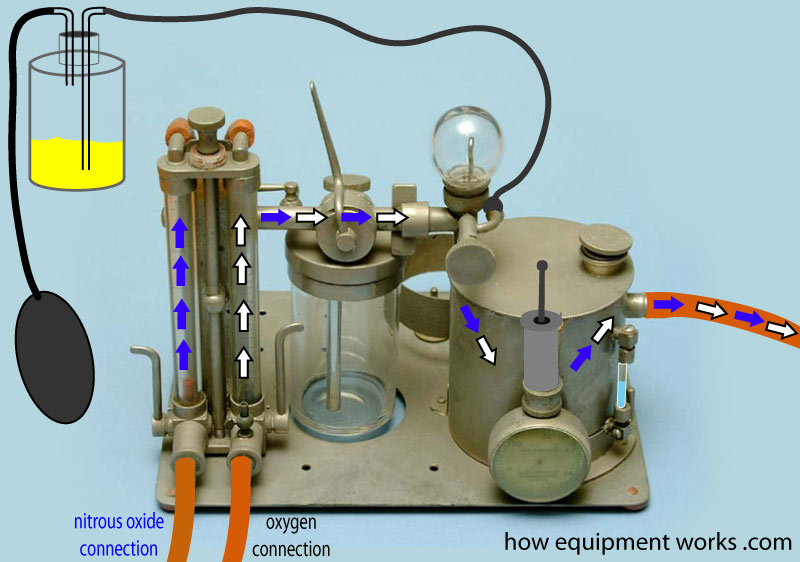
The fresh gas flows through the flow meters, through the horizontal tube, then goes into the warming chamber, and finally exits via the tube that goes to the patient.
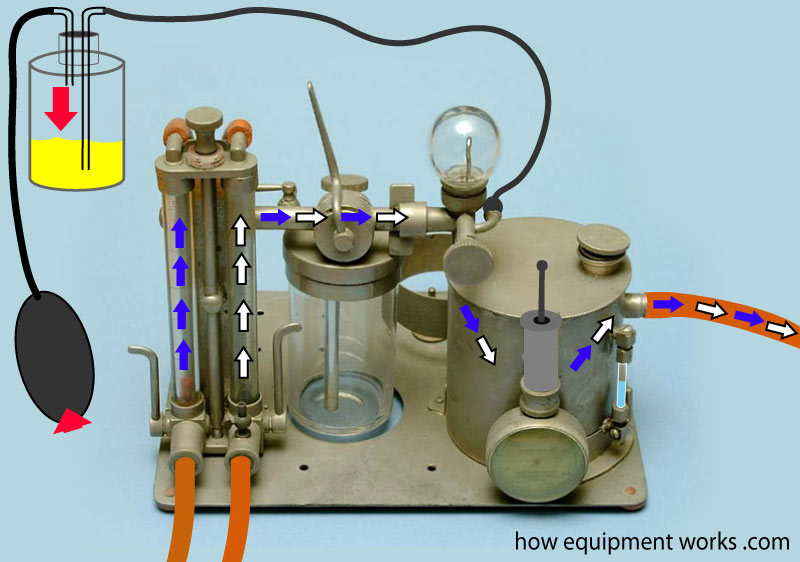
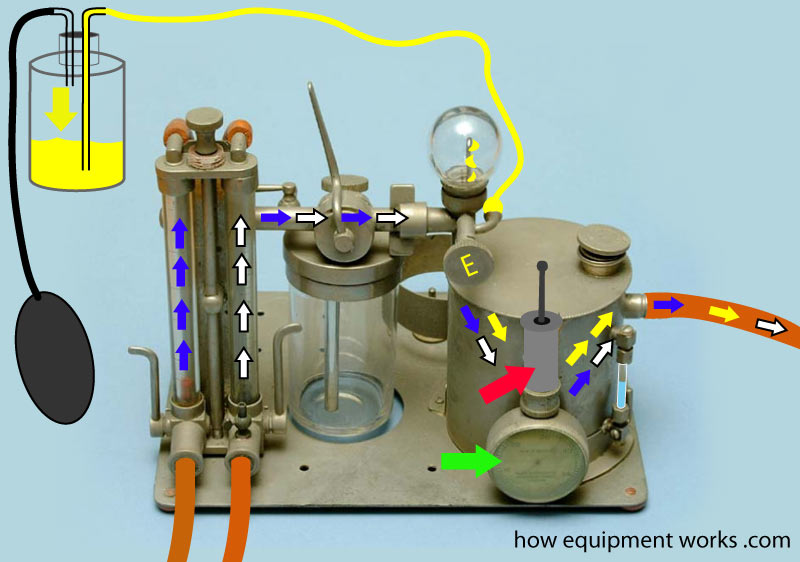
Now let us give some ether to this patient. To do this, we need to first pressurize the ether bottle (yellow arrow). You repeatedly squeeze the pressure bellows (green arrows) just like you would pump up a blood pressure cuff or infusion pressure bag. This causes a high pressure to be created in the ether bottle (red arrow).
Once the pressure has built up, you can stop squeezing the bellows. A non-return valve (red triangle) prevents the pressure from leaking out.
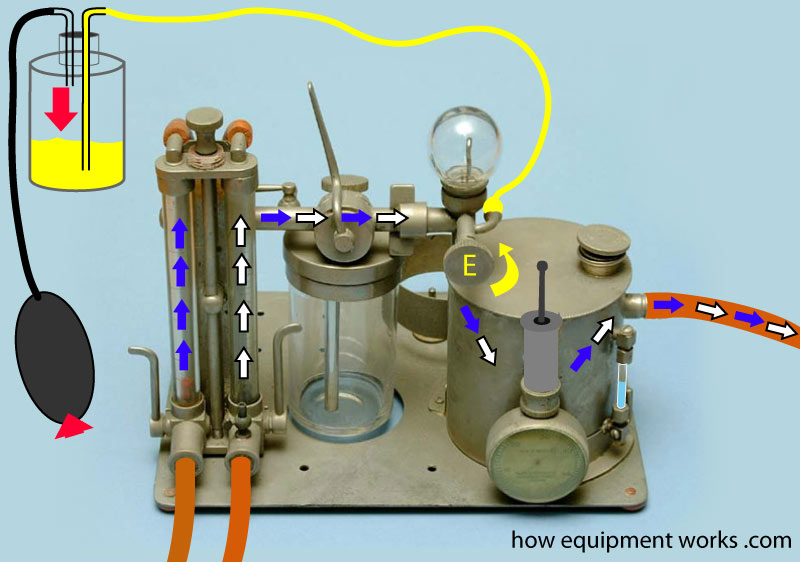
You now turn the “ether control knob” (E). Because of the pressure in the bottle, the ether starts to flow.
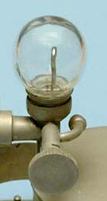
Now I can finally explain this glass sphere that you might have been curious about from the beginning.
As you turn the ether knob (E), the ether drips through the sphere and goes into the warming chamber, where it becomes vaporised. The ether along with the oxygen and nitrous oxide now go to your patient and your anaesthetic has started successfully!
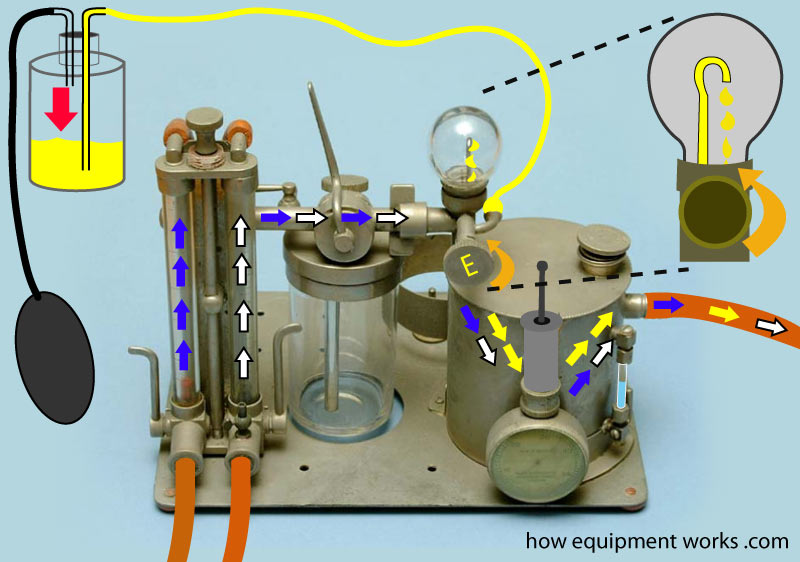
The sphere allows you to see the rate of flow of ether drops. You can adjust the drop rate by turning the knob “E”. To make your patient deeper, increase the drop rate and do the opposite, reduce the drop rate.

Even in such an ancient machine, there is some attention to safety. There is a pressure gauge (green arrow) to show you what the gas flow pressure is. And just in case you are half asleep yourself and not watching the gauge, there is a pressure relief valve (red gauge) to release any dangerously high pressures.
I hope you enjoyed using the Magill apparatus.
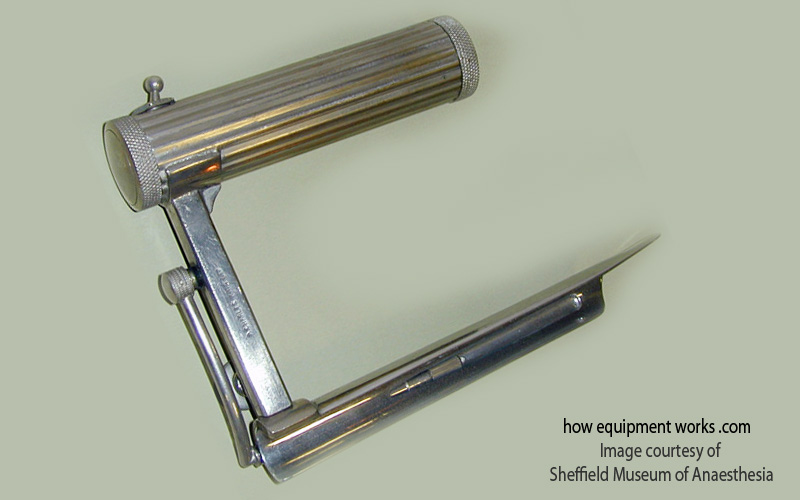
Magill Laryngoscope
You want to intubate your patient, so they give you a Magill Laryngoscope( invented by Ivan Magill,1888 – 1986). It consists of a battery compartment (blue arrow), a light switch (red arrow), a light bulb (yellow arrow) and of course a blade (green arrow).
You take it to your hand and fail to intubate.
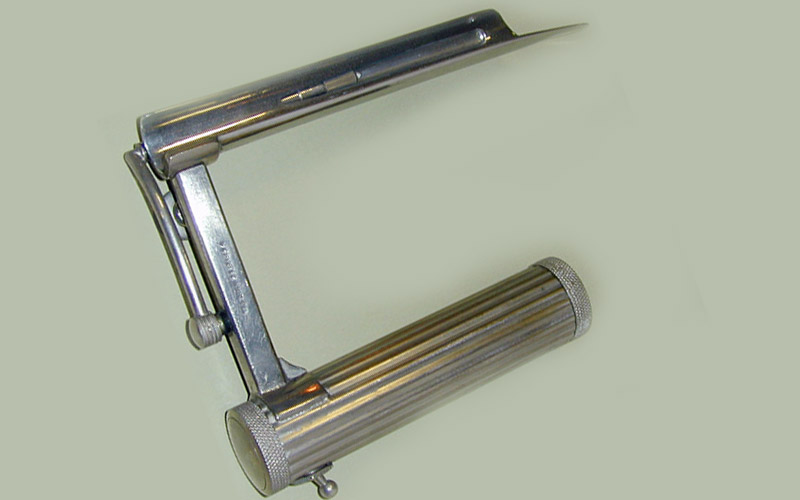
Fortunately, you realise, without much delay, that you were holding it upside down!
Holding it correctly, you successfully intubate the patient.
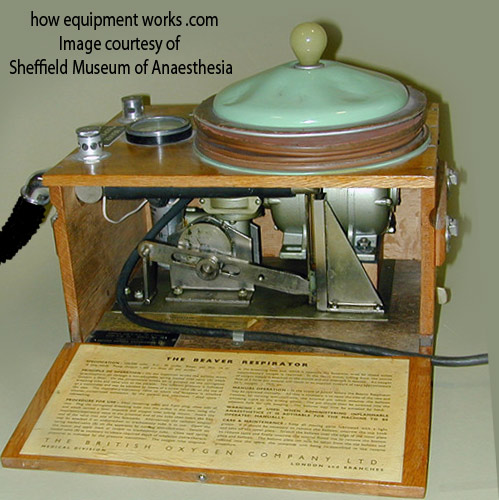
Beaver Respirator
The ventilators you were using suddenly stopped working. Fortunately, you have a good assistant who brings in another ventilator, called the “Beaver Respirator” (1952).
This ventilator has a rather simple mechanism. There is an electric motor (M) that, through a set of gears, turns the wheel (W). This makes the pin (pink dot) turn up and down and this in turn makes the attached lever move up and down (dark blue arrows). This lever is attached to the big bellows outside the box, and therefore as it moves, it moves the bellows up and down (red arrows). The movement of the bellows makes air move in and out of the tube that is connected to the patient circuit (black arrow). There are valves (green arrows). One is an expiratory valve and the other is a high-pressure relief valve. There is an airway pressure gauge (light blue arrow).
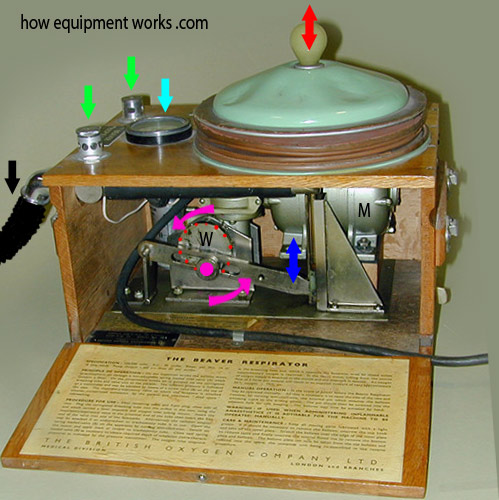
Here the bellows are up.
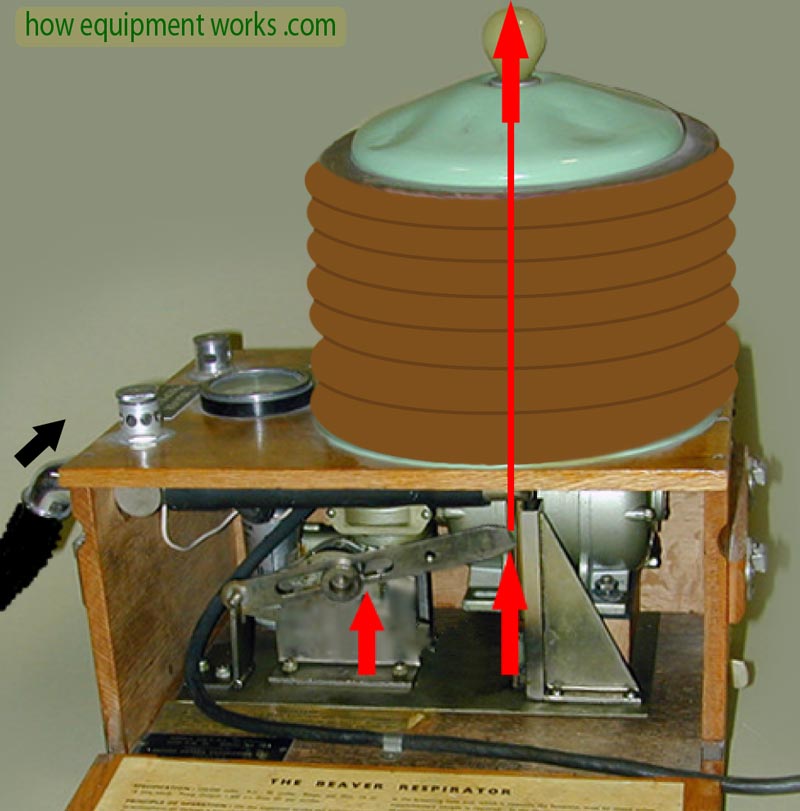
And here they are down.
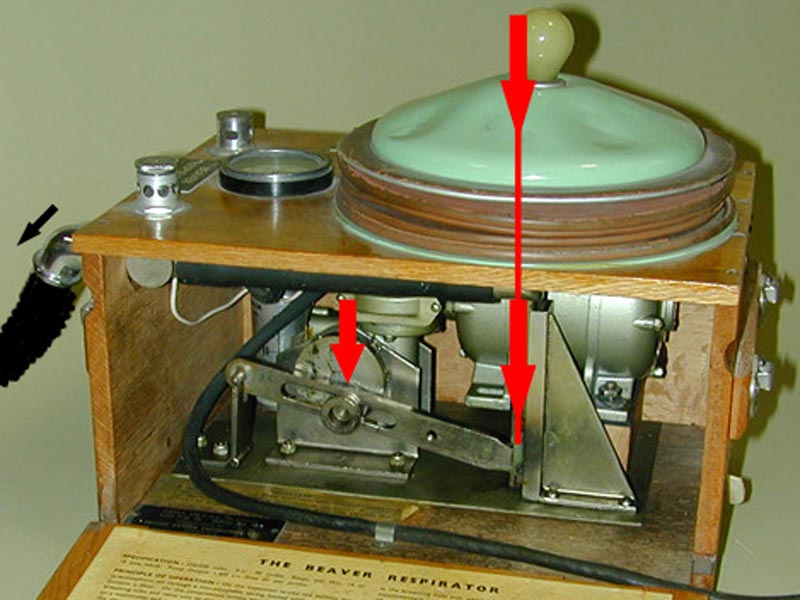
Unfortunately, this simple design had limitations. The respiratory rate could only be either 14 or 18 breaths per minute. The bellow discharge volume was fixed at 1400 mL! However, if there was a power failure or fault, the bellows could be moved by hand.
Carbon dioxide analyser
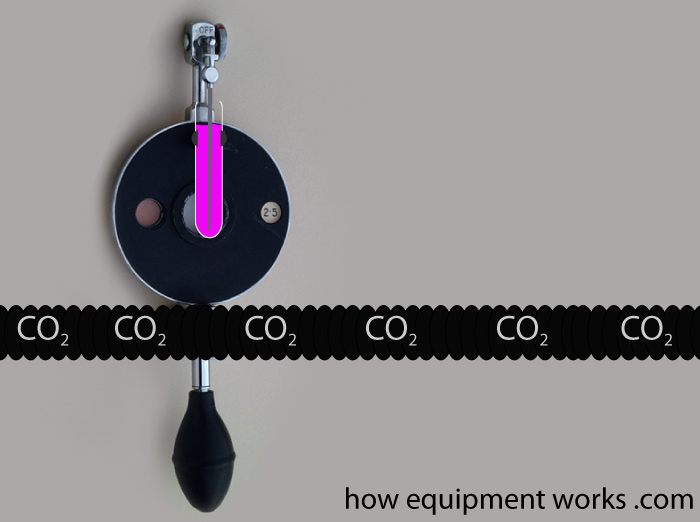
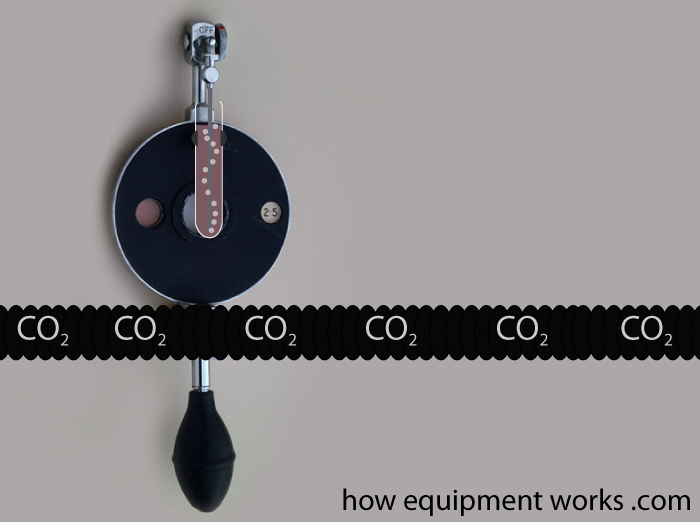
You suddenly realise that you aren’t monitoring the patient’s expired carbon dioxide. You look for a capnograph and find none. Instead, you have to do with a carbon dioxide monitor made around 1960 by the British Oxygen Company (BOC). Shown below is a museum picture of the device. You will agree with me that it looks really mysterious! Don’t worry, I will explain to you how it works.
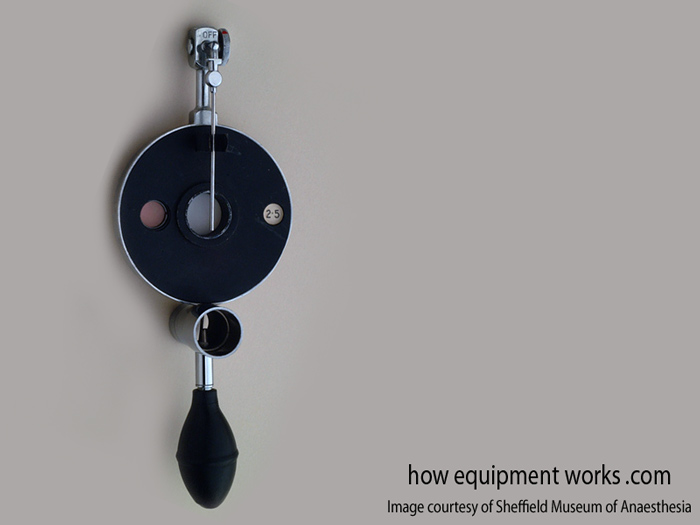
First, we need to connect it to the patient’s breathing system (e.g. expiratory limb of a circle breathing system).

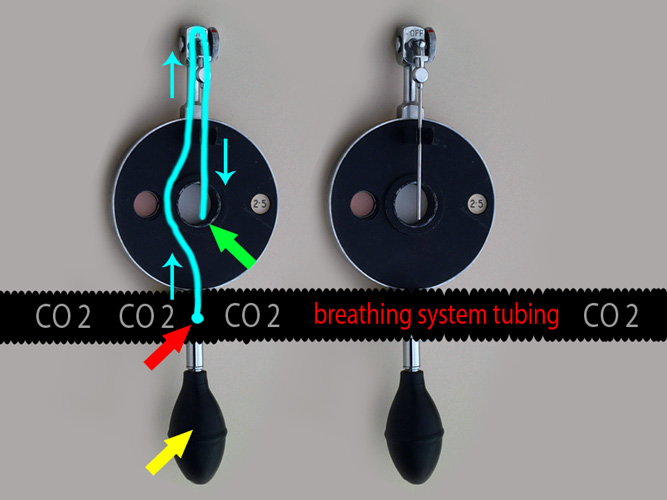
The device has a thin tube (blue line) which starts from the breathing system (red arrow) and ends at the nozzle (green arrow). I have put an unmarked one next to it to make it easier for you to see). When you squeeze the rubber bulb (yellow arrow), breathing gases containing CO2 go through the thin tube and emerge from the nozzle.
Now the mystery is, how does this contraption measure CO2? The trick is that the device comes with glass ampoules containing a pinkish liquid, which the company called a “special test solution”.
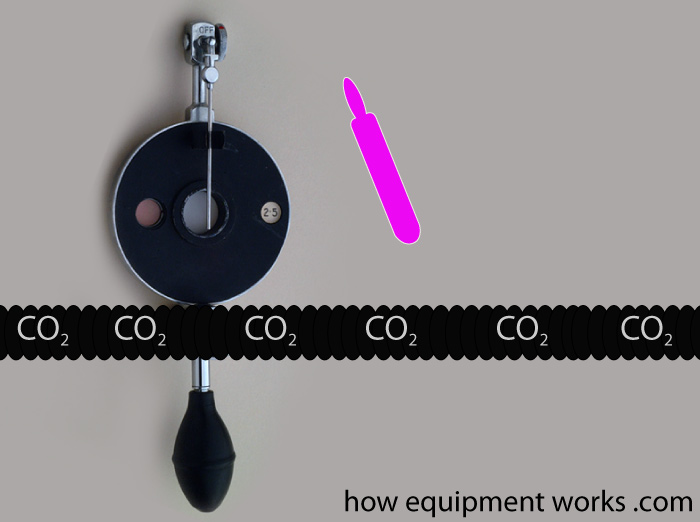
You break the top of the ampoule and clip it onto the device so that the nozzle is submerged in the liquid.
Now squeeze the bulb. This forces the breathing tube gas containing CO2 to emerge through the nozzle and bubble through the special liquid.
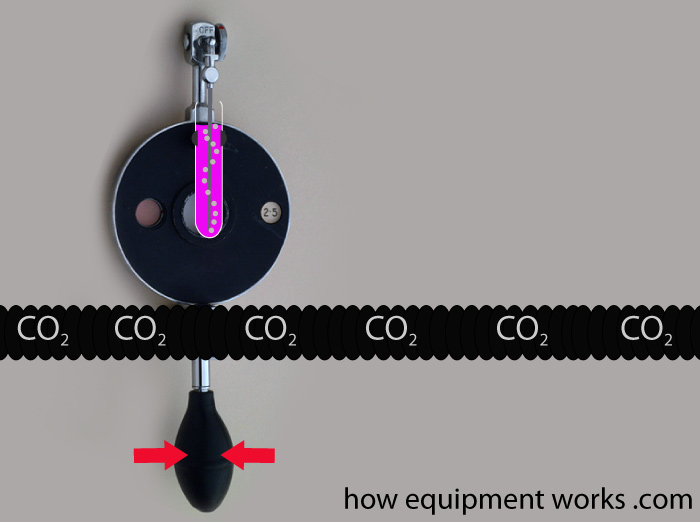
The liquid has special chemicals in it that react with the CO2 and change colour according to the CO2 concentration of the gas bubbling through.
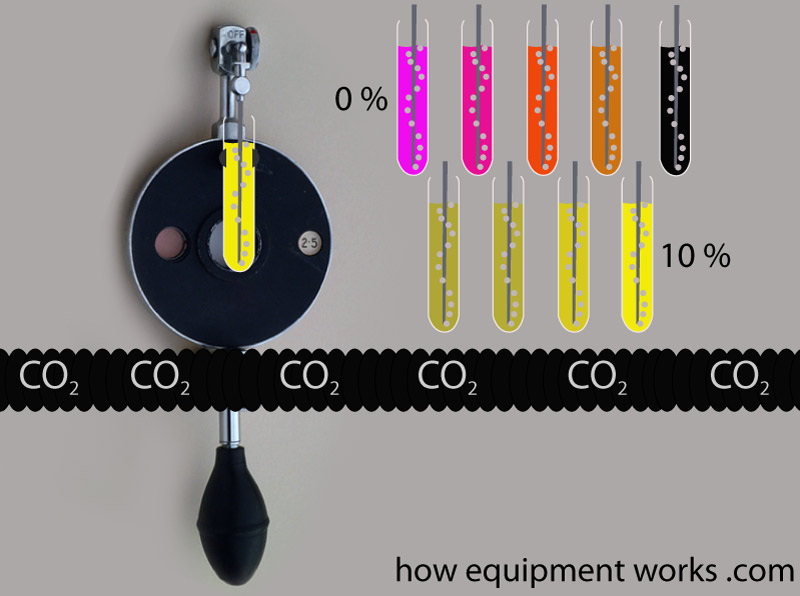
The CO2 is expressed in “%”. Pink colour represents 0 % and yellow represents 10 %. In between colours show in between CO2 concentrations.
So how do you work out which colour is your sample? The device has a “colour wheel” which you can turn that is hidden behind two windows (blue and red arrows). You turn the wheel till the colour in the left window (blue arrow) matches the colour of the test solution. Once you do that, you will be able to read the carbon dioxide concentration in the other window (red arrow).
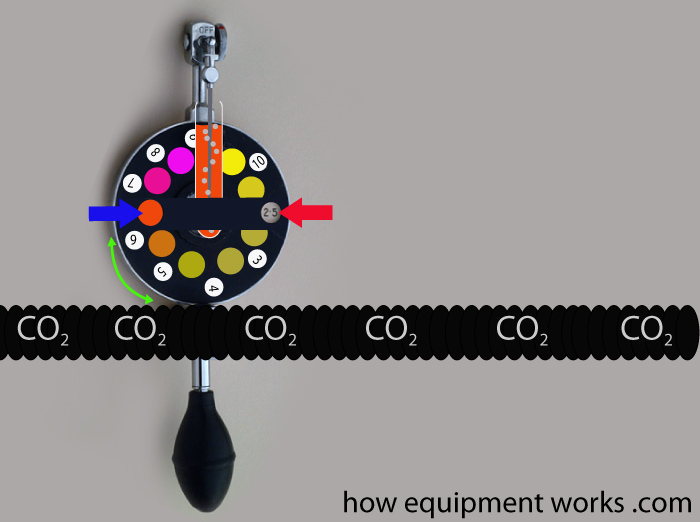
So now you know how the BOC carbon dioxide analyser works!
So next time you glance at a capnograph, just think about how difficult it was in those days!
Future anaesthetic machine
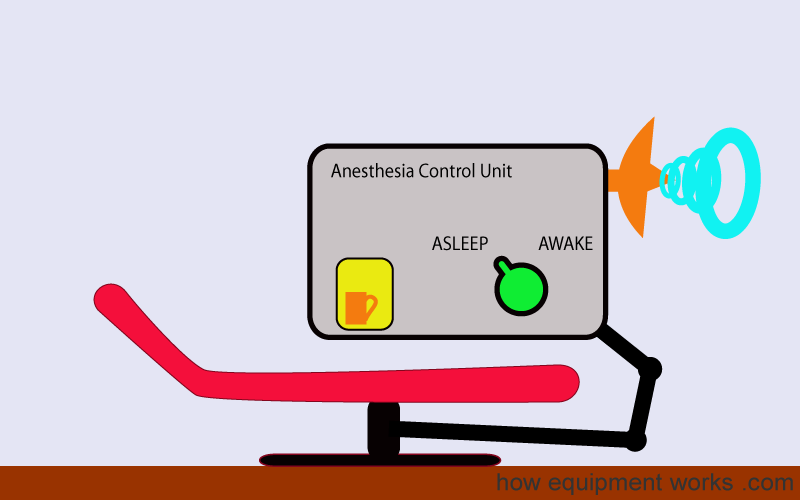
You are probably tired of learning about the past. Don’t worry, the future will be much better. Here is an anaesthetic machine, I have designed for the future. It has a “sleep magnetron” (the orange dish) which sends a special beam to the patient’s head to keep him asleep. The control unit ( green ) is quite simple, with only one switch. The red couch is not for the patient! It is for the anaesthetist to rest on. The machine also has a place to keep the coffee cup warm.
We have now reached the end of our discussion on interesting historical anaesthesia equipment. I hope it has given you a good introduction to the subject and will help you when you read further on this topic. Hope to see you soon in another section. Bye!

Hello! My name is Pras, and I am the author of this website. I have made the website completely free to access so that people from all over the world can benefit from it.
If you can afford it, I would be very grateful if you would consider making a single donation of one dollar (or the equivalent in your currency) to help cover the expenses needed to run this website (e.g. for special software and computers). For this website to survive, donations are desperately needed. Sadly, without donations, this website may have to be closed down.
Unfortunately, perhaps because many people think that someone else will donate, this website gets only very few donations. If you are able to, please consider making a single donation equivalent to one dollar. With support from people like you, I am sure this educational website will continue to survive and grow. Thank you very much for your support.