Note: This is part 2 of the discussion of how MRI machines work. If you have not read part 1, please click here to go to part 1.
How the MRI machine is able to target different areas of the body
You will recall that the human body is full of water and that therefore there are hydrogen nuclei everywhere. The MRI machine however needs to scan the body in an organised manner. It cannot simply scan the whole body instantly, as the signals returning from all parts of the body at the same time would result in a messy mixed-up signal.
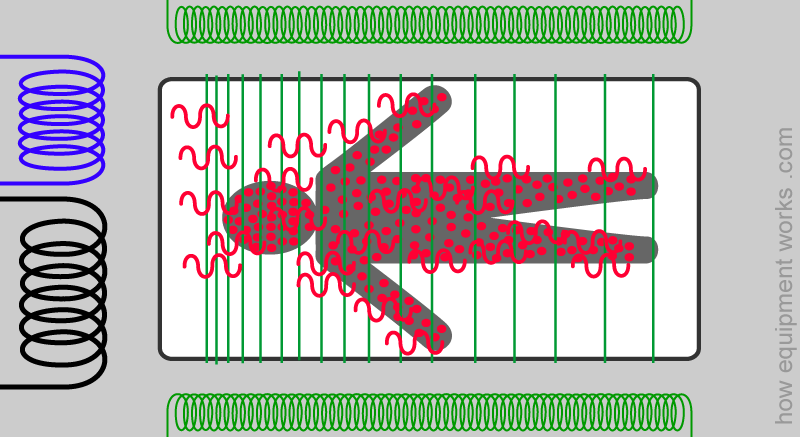
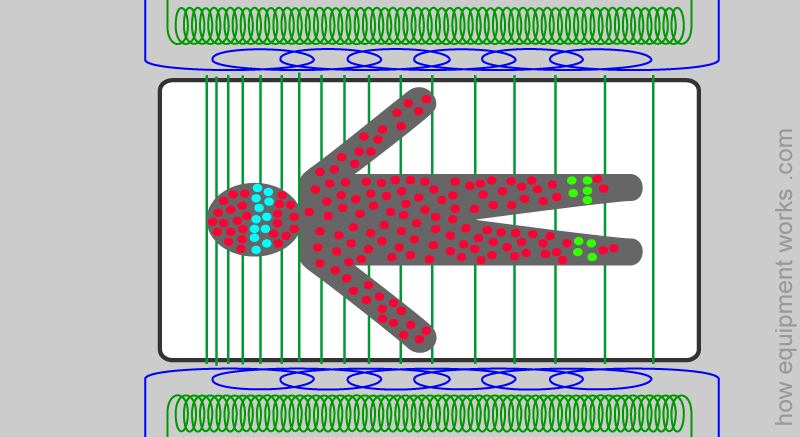
Instead, the MRI machine needs to scan the body in sections. It needs to record signals from hydrogen nuclei in one area before moving on to the next. For example, let us imagine, for the purpose of discussion, that we are doing a scan of the head. Imagine that it is currently interested in scanning the section of the head shown by the blue arrow. It needs a way to make the hydrogen nuclei of interest (blue ones in the image) respond by taking and returning energy. At the same time, it needs the other hydrogen nuclei not to respond (i.e. all the red dots).
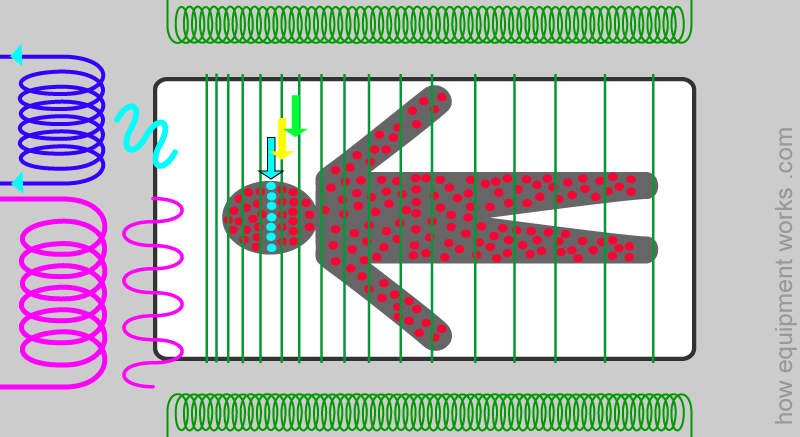
After it has dealt with the section shown by the blue arrow, it now needs the hydrogen nuclei located in the next section (yellow arrow) to respond by taking and returning energy. Again it doesn’t want hydrogen nuclei in other areas to respond (blue and red dots).
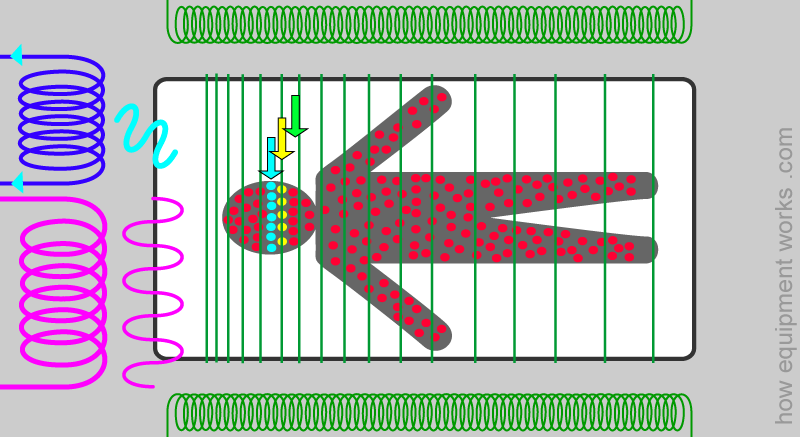
The MRI machine then looks at the section shown by the green arrow and the process goes on. Combining information from these different sections enables it to eventually construct an image for you to see. Now the question is, how does the MRI machine make only hydrogen nuclei in the area of interest respond while keeping all the other hydrogen nuclei quiet?

To understand how the MRI machine selects one region at a time, we need to first understand the concept of ‘resonant frequency’.
Resonant frequency:
We saw how the RF coil emits energy which can be absorbed by some of the low energy nuclei.
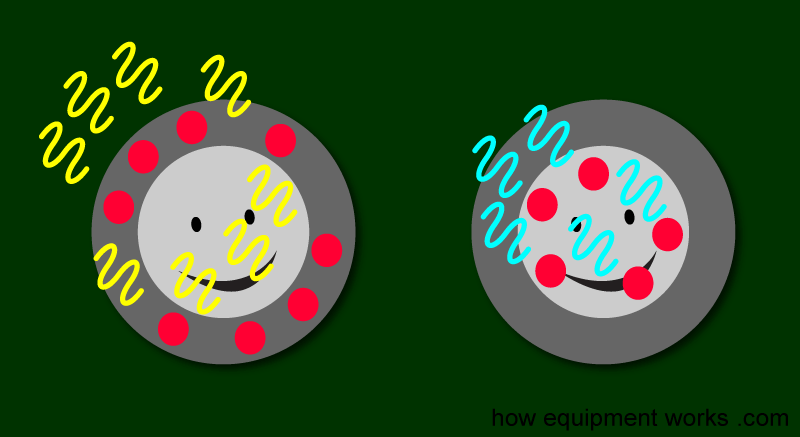
However, quantum physics complicates things slightly. According to its rules, the hydrogen nuclei don’t absorb just ‘any’ energy. They can be quite fussy about ‘what’ energy they accept.
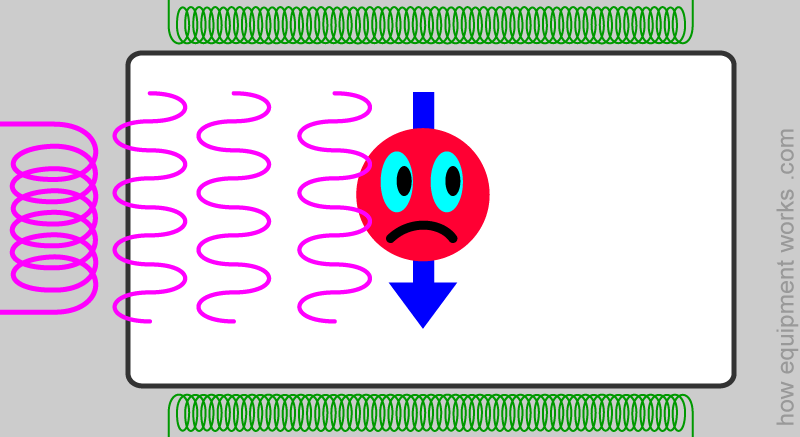
The hydrogen nuclei best absorb energy given in a very specific frequency called the ‘resonant frequency’. The energy given in frequencies that are below or above the resonant frequency is not absorbed by the nuclei.
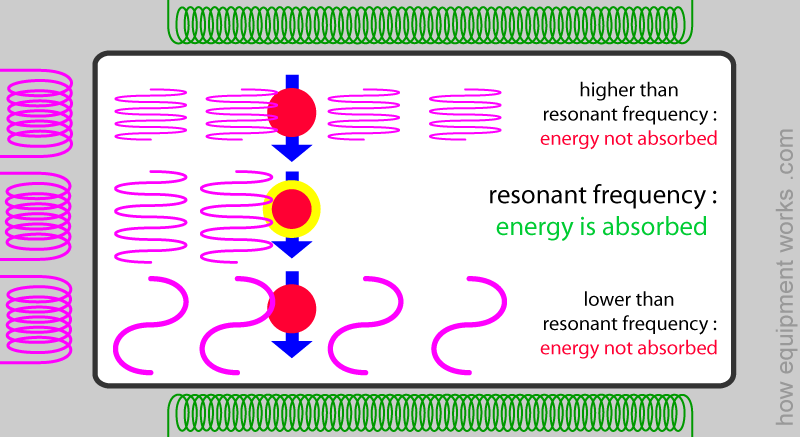
Therefore when the MRI sends the radio frequency (RF) energy wave, it does this at the resonant frequency of the hydrogen nuclei.
This is why it is called magnetic “resonance” imaging.

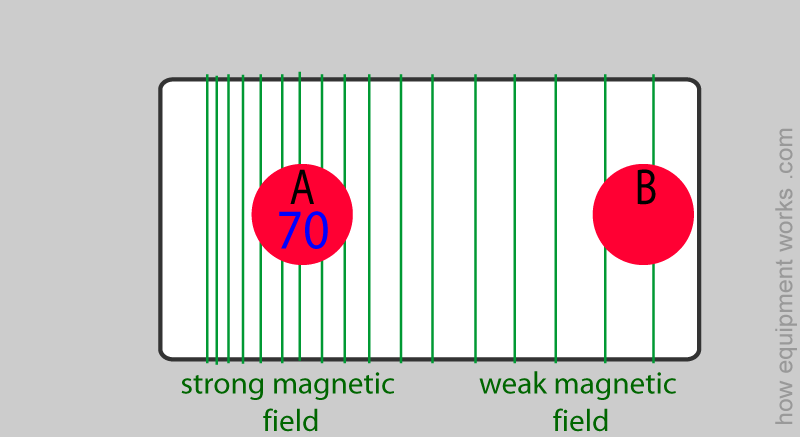
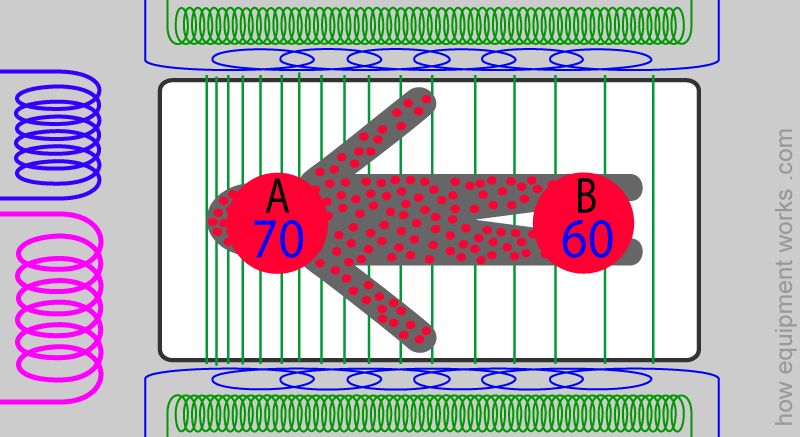
The resonant frequency of a hydrogen nucleus depends on the strength of the magnetic field in the area where it is located. The higher the strength of the magnetic field, the higher the resonant frequency. Let me explain. Below are two hydrogen nuclei. The hydrogen nucleus ‘A’ is in a stronger magnetic field (represented below with more magnetic field lines) while nucleus ‘B’ is in a weaker magnetic field.
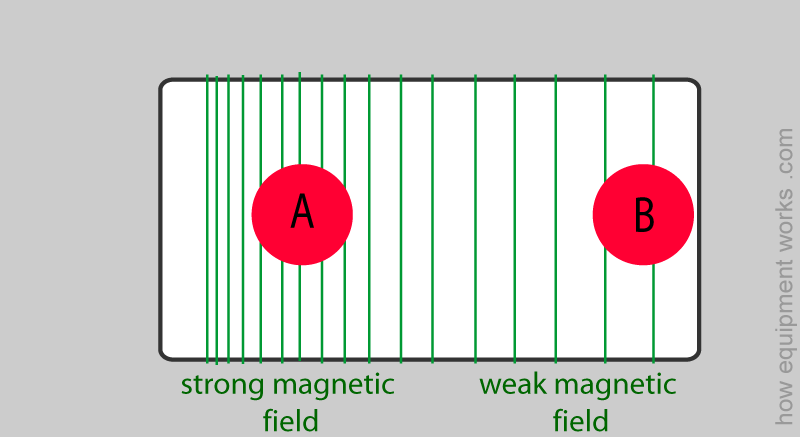
The hydrogen nucleus ‘A’ is in a stronger magnetic field and therefore has a higher resonant frequency. Just as an example, let us say nucleus ‘A’ has a resonant frequency of 70 MHz (MHz = mega hertz = millions of cycles per second). I have chosen this number just as an example. The actual values found in MRI scanners will be different.
Hydrogen nucleus ‘B’ is in a weaker magnetic field. Therefore its resonant frequency is lower. For explanation purposes, let us say that it is 60 MHz.
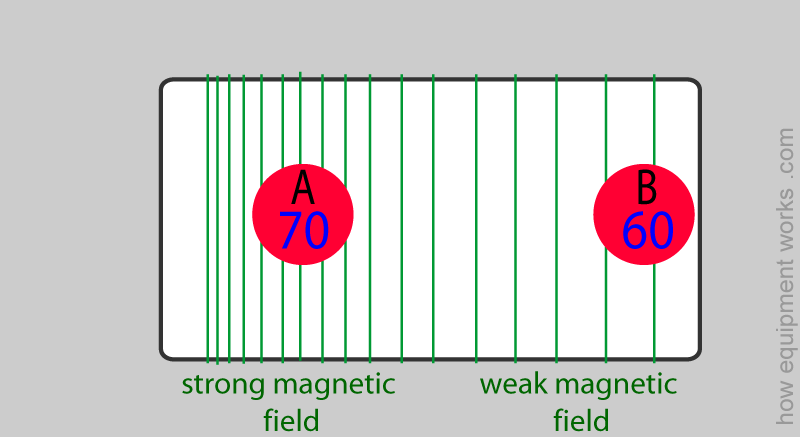
As will be explained to you shortly, this relationship between the magnetic field strength and resonant frequency enables the MRI machine to scan a section of the body at a time.

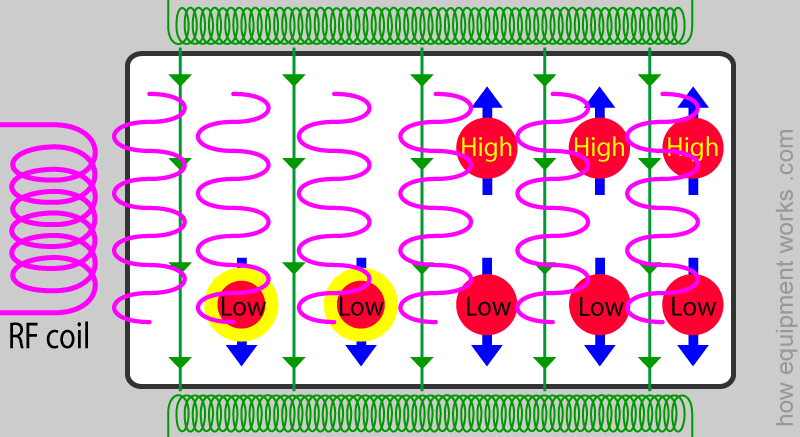
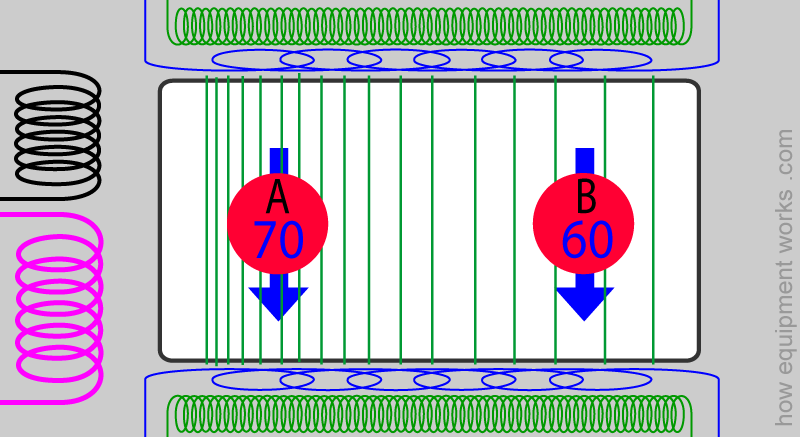
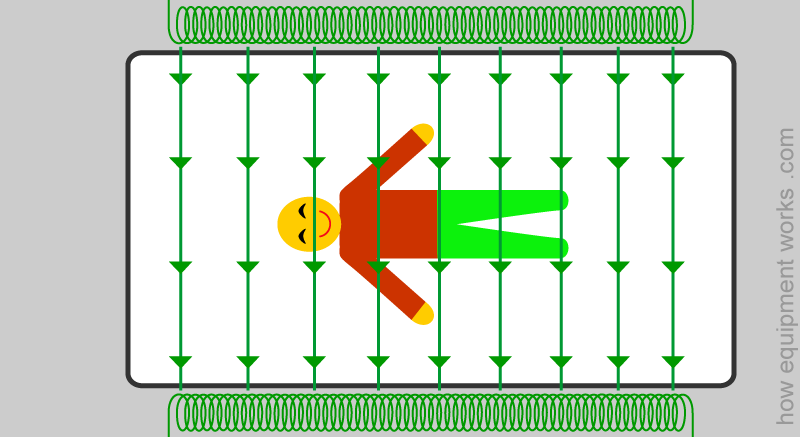
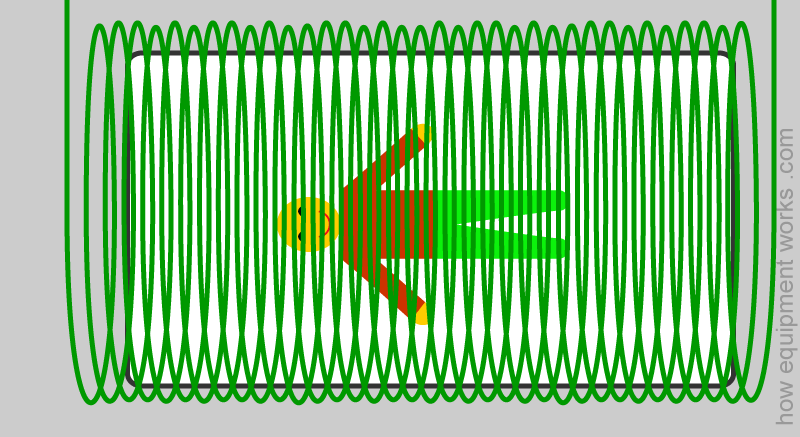
As mentioned before, there is a strong main magnetic field in the MRI machine. This main magnetic field is uniform throughout. i.e. the strength of the magnetic field is equally strong everywhere.
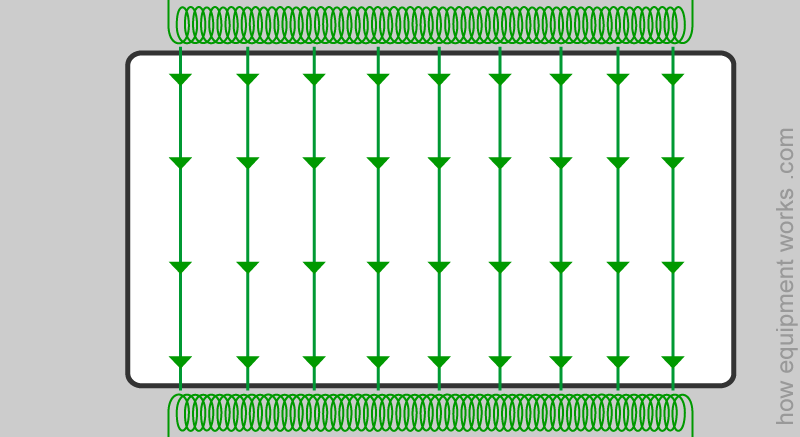
There are special coils shown in blue in the diagram below that alter the main magnetic field. These coils, ‘modify’ the magnetic field produced by the main magnetic coil (green coil) so as to make one end of the patient have a stronger magnetic field and the other end have a weaker magnetic field.
In the example shown below, as we go from the patient’s head towards his feet, the main magnetic field becomes weaker. We would now say that there is a ‘magnetic gradient” along the patient. The coils that modify the main magnetic field are called “gradient coils”. How these magnetic field gradients are created is fascinating but I will explain that later.

Now you will recall that the resonant frequency of a hydrogen nucleus depends on the strength of the magnetic field in the area that it is located in.
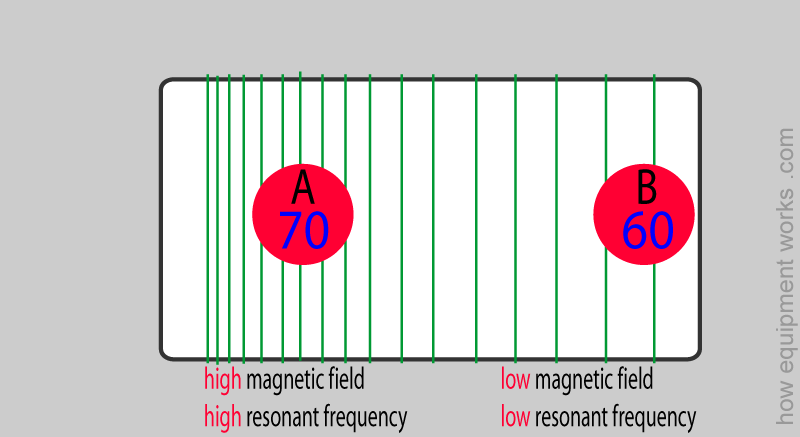
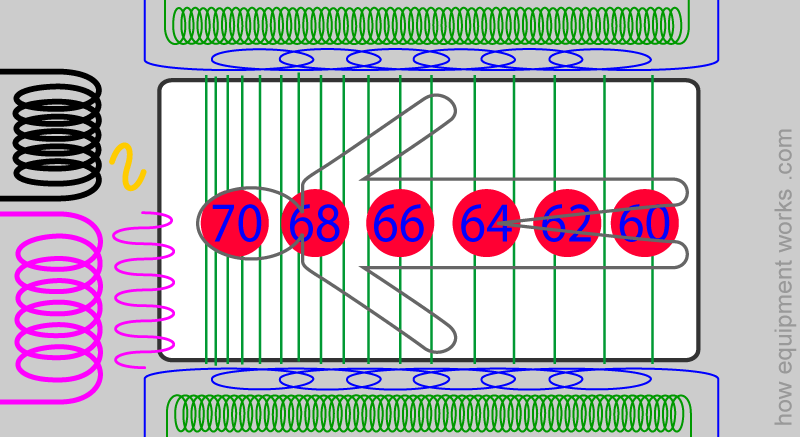
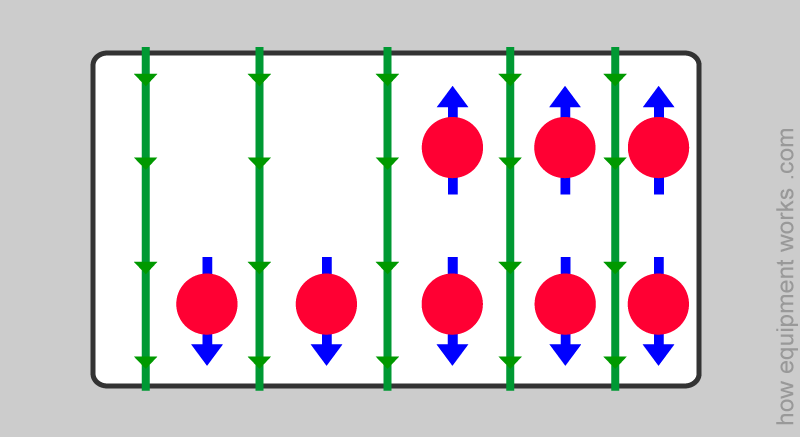
As you have seen before, the gradient coils make the main magnetic field have a gradient: stronger at one end and weaker at the other end. This means that, from the head of the patient to the foot of the patient, the hydrogen nuclei are exposed to different strengths of the magnetic field. At the head of the patient, for example, the hydrogen nuclei (blue) are exposed to a high magnetic field and therefore have a high resonant frequency. On the other hand, at the foot of the patient, the hydrogen nuclei (green) are exposed to a low magnetic field and therefore have a lower resonant frequency.
Let us magnify, for clarity, one hydrogen nucleus from the head end (A) and one from the foot end (B). As explained, nucleus A is in a stronger magnetic field and therefore has a high resonant frequency (e.g. 70 MHz). Nucleus B is in a weaker field and therefore has a lower resonant frequency (e.g. 60 MHz).
Let us get rid of the patient diagram to make things less cluttered.
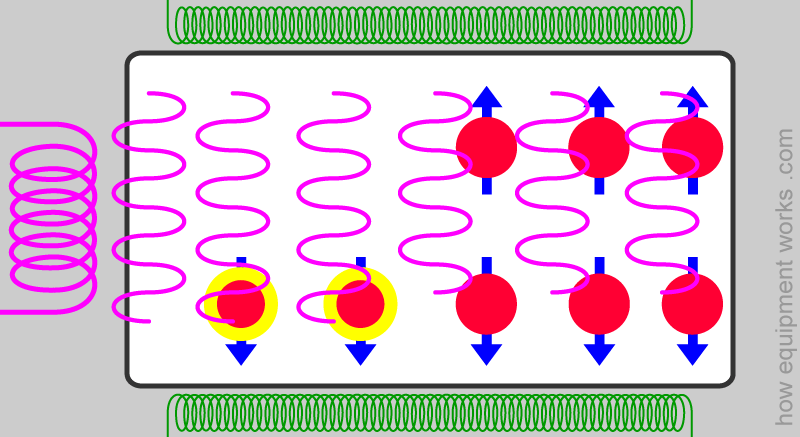
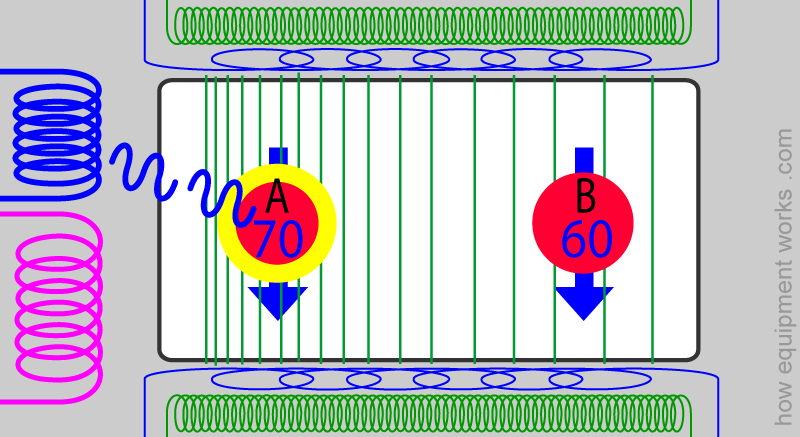
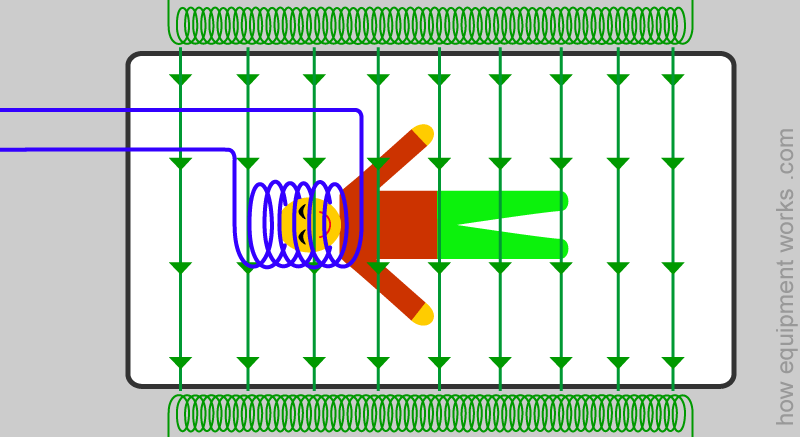
Now you are ready to understand how the MRI machine selects various areas to study. Let us imagine that it wants to image the foot area (i.e. it needs the foot area hydrogen nuclei (B) to respond). It does this by sending RF energy (from the pink RF coil) at the resonant frequency of the nuclei of interest, in this case, 60 MHz.
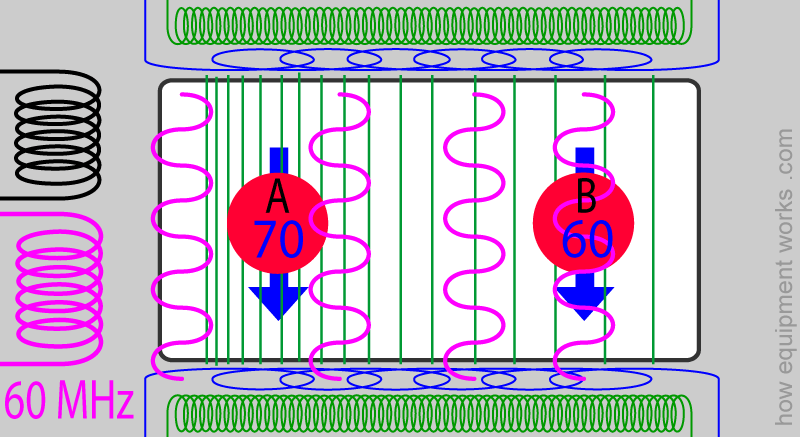
Because the RF energy of frequency 60 MHz is below the resonant frequency of the hydrogen nucleus at the head end of the patient (A), it simply passes this nucleus without getting absorbed. On the other hand, the 60 MHz RF energy exactly matches the resonant frequency of the hydrogen nucleus at the foot of the patient (B). This nucleus therefore absorbs the energy and changes its spin direction to become a high-energy nucleus.
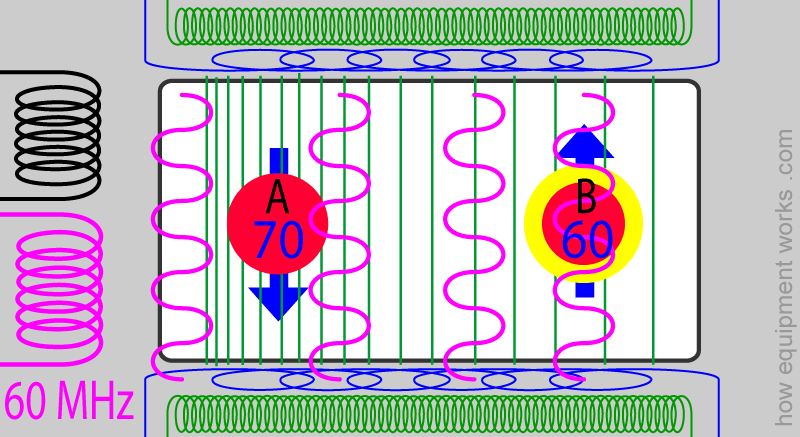
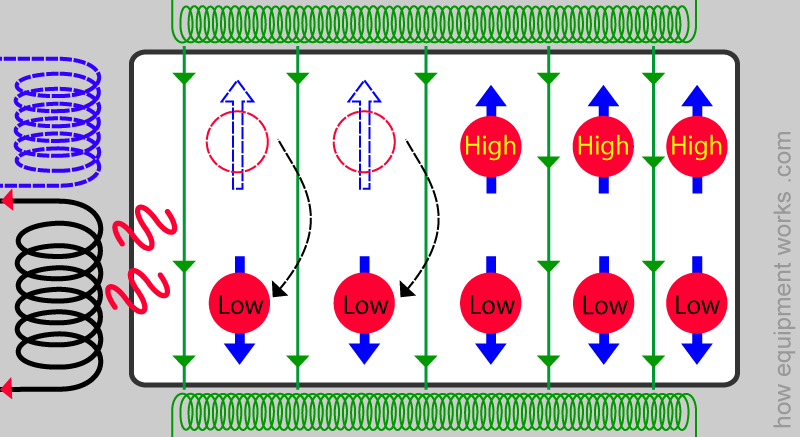
Once the RF coil stops transmitting energy, the listening coil (green) listens for a return signal of energy. Since it was only the hydrogen nuclei at the foot end (B) that absorbed energy, it is only these nuclei that now release energy. The other nuclei, e.g. ‘A’, do not respond, since they do not absorb energy. In this way, the MRI machine is able to get information specifically from the lower limb area of the patient.
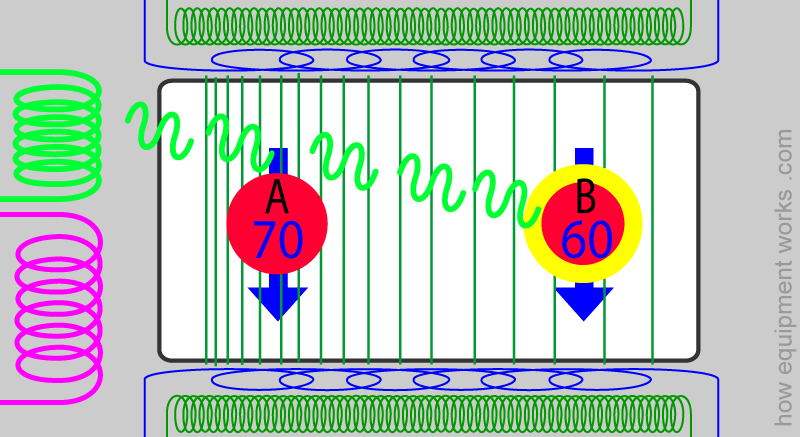
Now let us imagine that the MRI machine wants to image part of the head of the patient i.e. the area where nucleus ‘A’ resides. To do this, the MRI machine changes the emitted RF energy frequency to now match the resonance frequency of nucleus A. Therefore, this time, hydrogen nucleus A absorbs the energy as it matches its resonance frequency, whereas nucleus B at the foot end ignores this energy as it does not match its resonance frequency.
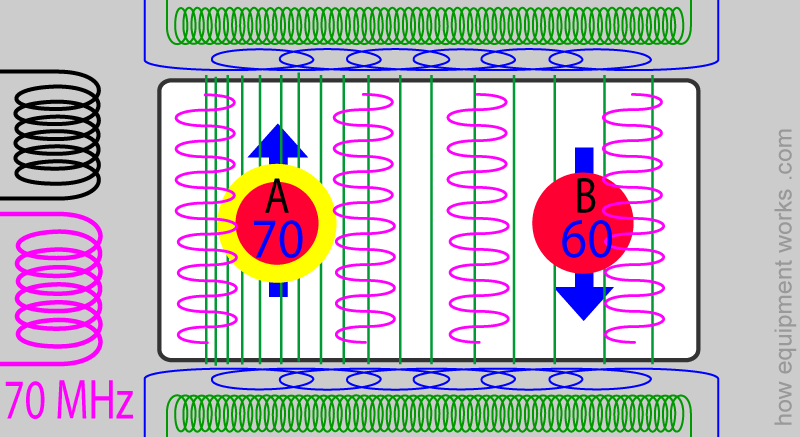
Once the RF coil stops sending energy, this time only nucleus A sends energy back.
So, by changing the frequency emitted by the RF coil ( e.g. 70, 68, 66, and so on ), the MRI machine can look for hydrogen nuclei section by section in an orderly manner.
The MRI machine has a very powerful computer that controls various aspects of the scanning process. The computer controls the gradient coil to create an appropriate magnetic gradient. It then controls the frequency of the emitted RF energy according to which part of the body it wants to look at. It then collects the return signals that arrive at the ‘listening coil’. It repeats this process till the required anatomy of the body has been scanned.
The type of returning signal from hydrogen nuclei in different tissues is different. For example, the returning signal from the hydrogen nuclei in the grey matter in the brain is different from the returning signal from the hydrogen nuclei in the white matter.
The computer processes all the information gathered to construct high-quality images. Of course, what I have explained to you is a super simplified version of how actually things happen. The real MRI machine works in a much more sophisticated way, and going into such detail is beyond the scope of this website and my mind.


Do you work in the anaesthetic team? If you do, please visit the free website below, which has anaesthesia-related fun and safety material. Click the button below to visit.

Receiver coils
You have seen that the receiver coil receives the energy released by the hydrogen nuclei that are moving from a high-energy state to a low-energy state. There are various types of receiver coils. It is often best to use a receiver coil that can be kept as near as possible to the area being imaged. For example, for imaging structures in the head, one can use a “head coil”.
In certain situations, it is not necessary to use a separate receiver coil (blue coil below). Instead, the same RF coil (black coil in the diagram) used to give RF energy waves to the nuclei can also be used to receive energy waves sent back by the nuclei.
The MRI operator will choose the most appropriate receiver coil needed to give good signals from the area of the body being imaged.
Magnet and Quenching
You will recall that the MRI machine needs a magnetic field to align the hydrogen nuclei.
That is why, “Magnetic Resonance Imaging” has the word “magnet” in it!

For the hydrogen nuclei to get aligned, the magnetic field needs to be extremely strong. The units of magnetism commonly used are Tesla and Gauss. A typical MRI magnet has a strength of 1.5 Tesla. This is about thirty thousand times stronger than Earth’s magnetic field.

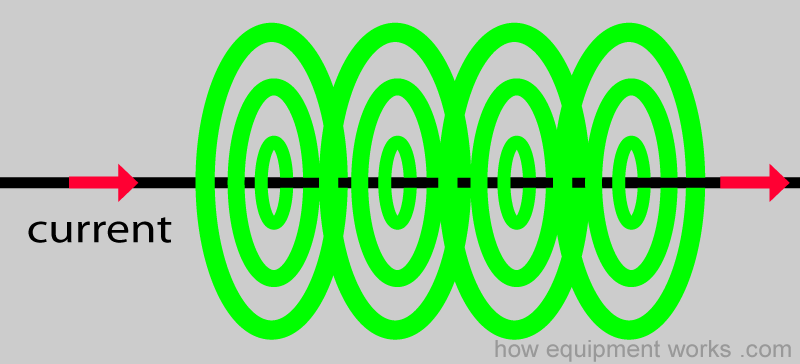
Such a powerful magnet needs a very special design. Typical magnets used in MRI machines are electromagnets. These make use of the basic electric property that when an electric wire carries an electric current, it generates a magnetic field around it.

To save space and to generate a strong enough field, the wire is usually wound into a coil. In my previous explanations, I had drawn the magnet as two green coils on either side of the patient. This I did to make the images less cluttered.
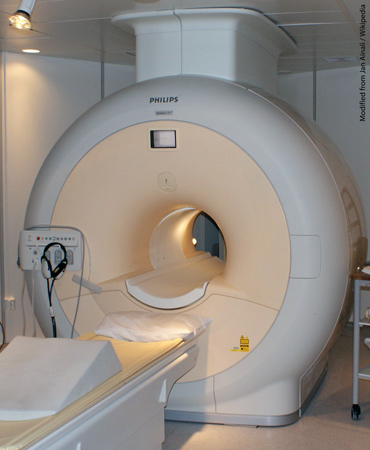
In reality, it is more like a coil of wire encircling the patient.
Below is an image of a real MRI magnet, which looks much less frightening than the one I have drawn above. The patient goes into the hole in the middle. The magnet coil goes around this hole.
I will now discuss a big problem faced by MRI magnet designers.
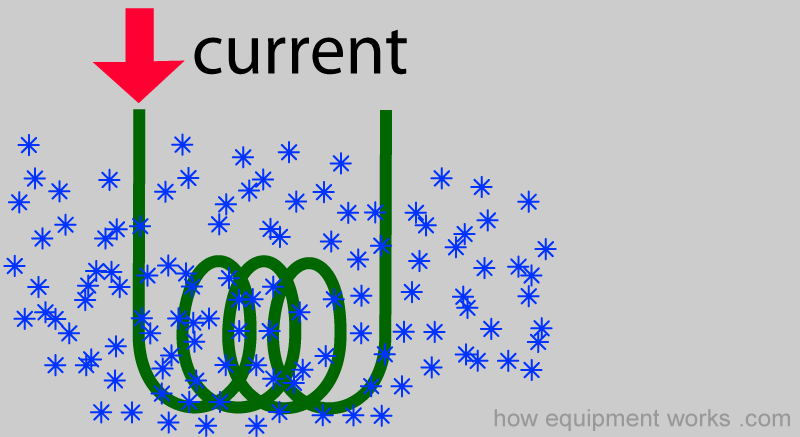
As you know, the MRI magnetic field has to be very strong. To create such a strong magnetic field, very large currents have to go through the wires of the magnet
You may recall from the section elsewhere on this website that deals with basic electricity, that wires have “resistance”. If you send a large current through a “normal” thickness wire, the wire’s resistance will try and resist the flow of this large current. This would heat up the wire and cause it to burn.

One option could be to use thicker wires since thick wires offer less resistance to current. However, to cope with the current needed to create strong magnetic fields that are needed for MRI machines, the wires would have to be very thick. The required thickness would be too much to make it usable in practice.
The designers of MRI systems came up with an ingenious solution. There is a special property that happens to wires when they are made very cold. At very cold temperatures, wires lose all resistance to electric current. The physics reasons for this are complex, so let us not go into those details. A wire that has been made cold enough to lose all its resistance is called a “superconductor”. A superconducting wire of even a ‘normal thickness’ can easily carry massive amounts of current since there is no longer any resistance to current flow.
So, in typical MRI machines, the electromagnet coils are made superconducting by keeping the coils immersed in a very cold liquid.
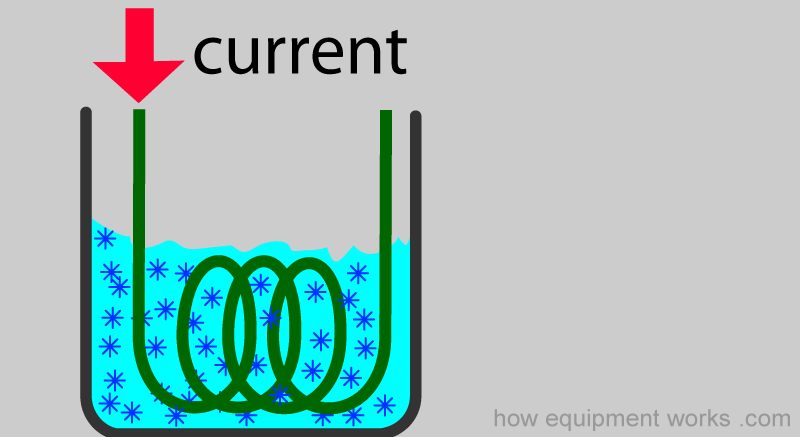
The substance chosen to keep the magnet coils cold is liquid Helium. Helium at room temperature is a gas, but at very cold temperatures, it is a liquid. As you can see below, the temperature of liquid Helium is very low!
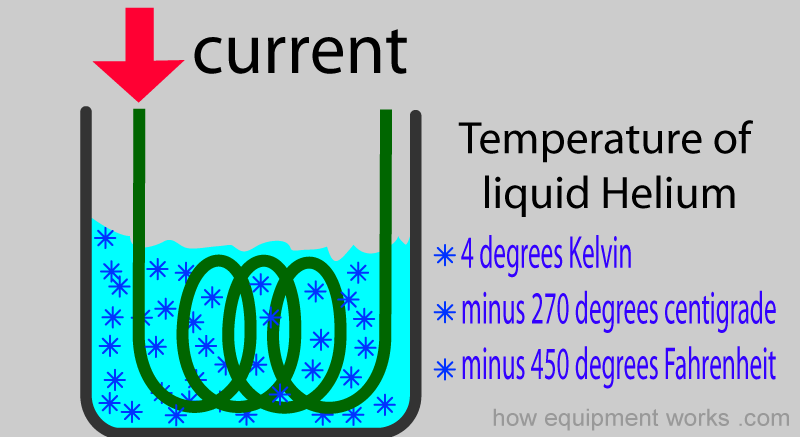
So to summarise, the MRI magnet needs to be very strong for the MRI to work. Normally to send such a strong current, the wires would have to be extremely thick and this is not practical. So the wires are immersed in liquid Helium and this makes them extremely cold. The extreme cold condition makes the wires lose all resistance and become “superconducting”. This enables the MRI machine to have large currents generating strong magnetic fields while keeping the wires relatively thin. i.e. Have a strong but compact magnet.
Going around forever!
In addition to enabling the use of thinner wires, superconductivity has another very interesting benefit. Normally, an electromagnet needs a constant current applied to it to generate a magnetic field.
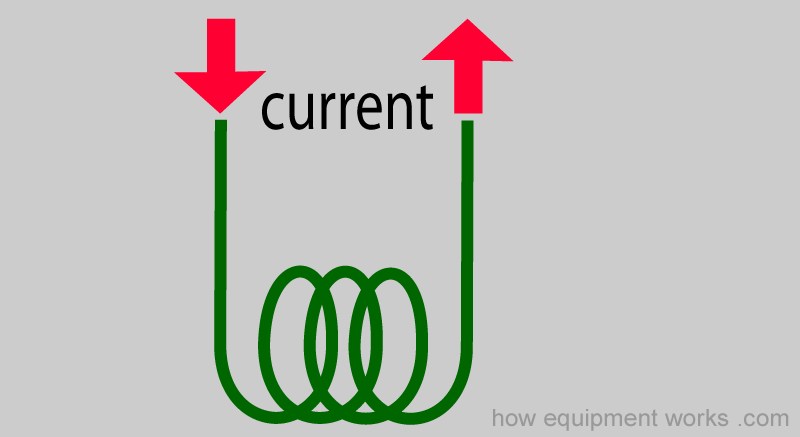
However, with superconductivity, since there is no resistance, any electric current given to the coil will simply keep flowing ‘forever’. This property can be made use of for the magnet not to need a continuous current supply. When the magnet is first installed, the engineers give it an electric current.
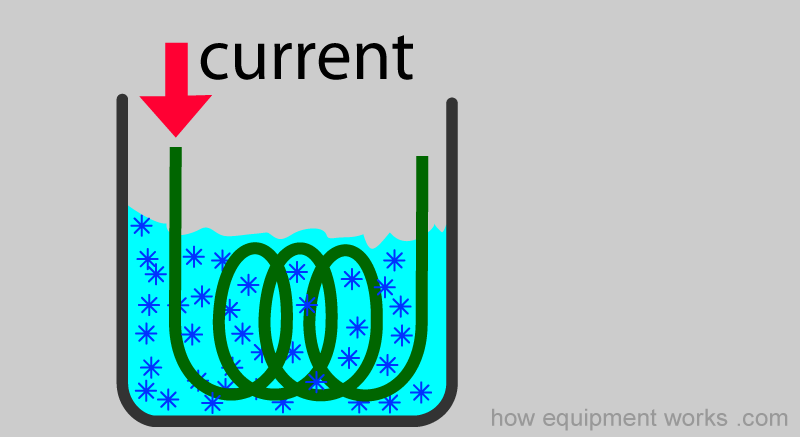
Once the initial current is given, because the wire is superconducting and has no resistance, it simply continues to flow round and round “forever”. No further current supply is required! This free flow of electrical current means that the coil keeps producing a magnetic field forever.
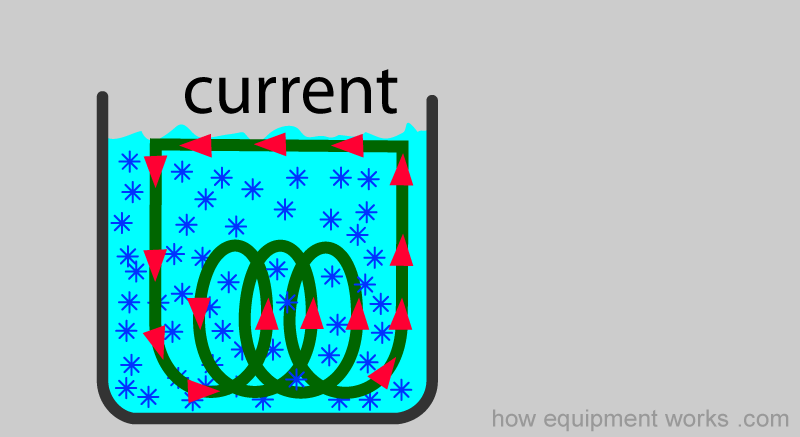
It very important to keep in mind that, because of the above phenomenon, the magnet is always ON. Even when the MRI machine appears to be “OFF” and the staff have gone home for the night, the magnet keeps on working.

So you need to be cautious of the magnet at all times, even when the machine appears “quiet and inactive “ and doesn’t have a patient in it.

Please click the “Next” button below to read the final part about how MRI machines work. Thank you.