Note: This is part 3 of the discussion of how defibrillators work. If you have not read part 1, please click here to go to part 1.
Discharge part of the defibrillator circuit
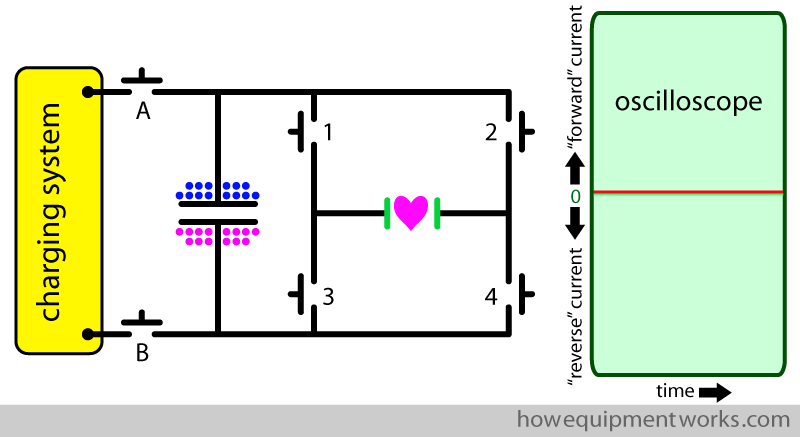
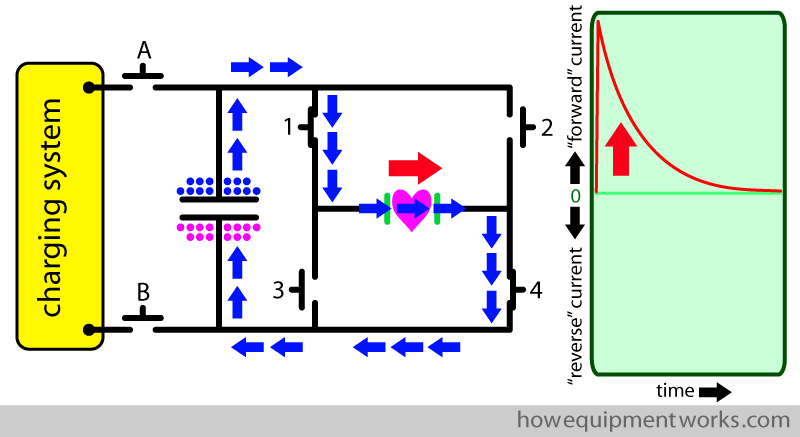
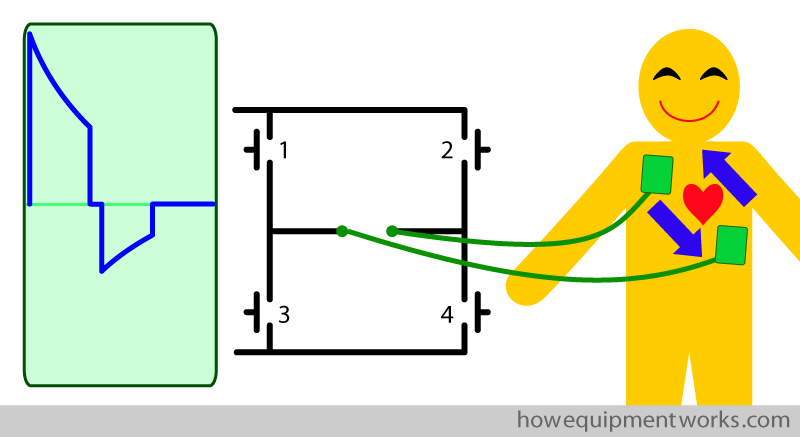
The capacitor is charged and is now ready for discharge into the patient. In the diagram below, the “discharge part” of the defibrillator circuit is shown in the green box. You will notice that there are four switches (1,2,3,4) in this area. These switches will, later, connect the heart to the capacitor. However, at present, these four switches are “OFF” and therefore the charged capacitor is not connected to the heart. The capacitor, at this point, is simply storing the charge.
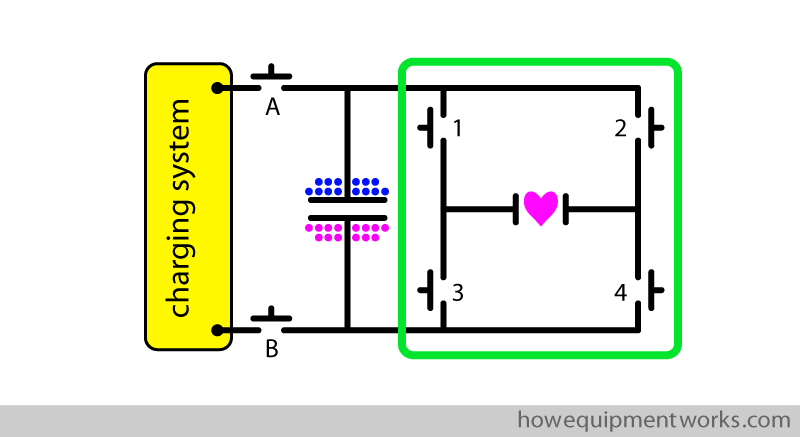
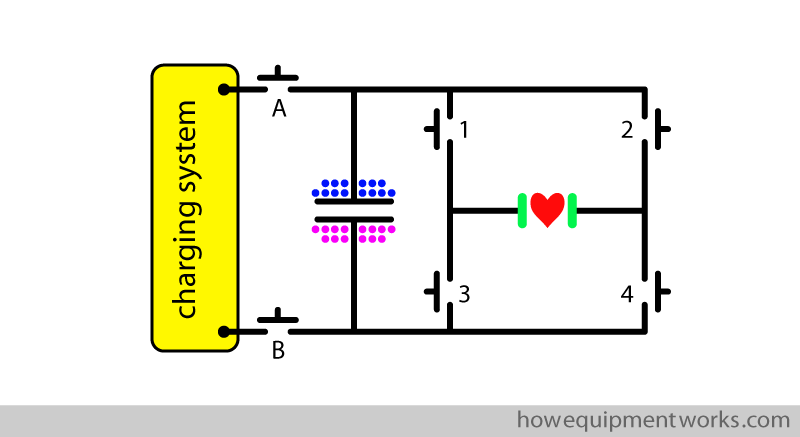
In my diagrams, the heart is of course drawn only as a symbol. The circuit connects to the heart via two pads (shown in green).
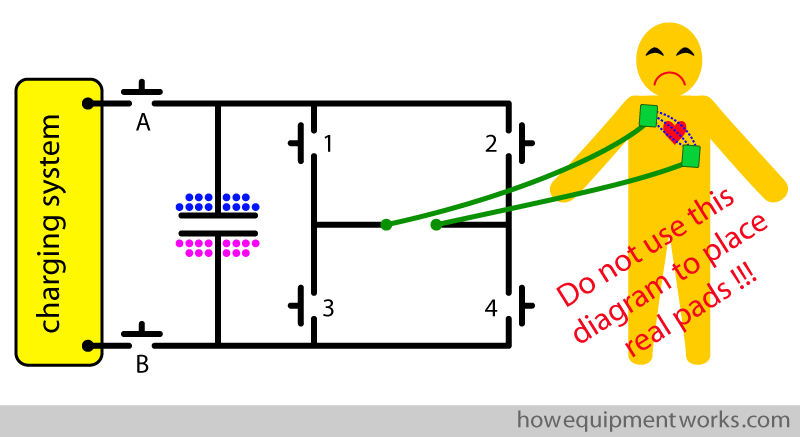
Of course, the real human heart is very different to the ones I have drawn in my diagrams. In actual use, the defibrillation current is applied to two areas of skin on the chest of the patient using special “conductive pads”. The current goes from the defibrillator to the patient and returns from the patient to the defibrillator via wires connected to the chest pads. The current goes from one pad to another, passing a variety of structures such as skin and of course the heart. By the way, please do not use my rough diagrams to guide where you actually place pads in a real patient!
Use of oscilloscope to see waveforms
During defibrillation, the current that goes through the heart changes over time. To study the flow of current over a period of time, one needs a device called an “oscilloscope”. An oscilloscope has a screen which has two axes as shown below. The horizontal axis shows time and the vertical axis shows the quantity we are measuring, which in the case of the defibrillation, is “current”. The oscilloscope is able to plot a graph of current over time and it will be very useful in our discussions ahead. The oscilloscope below has been connected to the defibrillator output. At the moment, the capacitor is not connected to the heart (i.e. switches 1,2,3,4 are all “OFF”) and therefore no current is flowing through the heart. The oscilloscope shows this as a flat trace (red line shown below) since the current flow over time is zero.
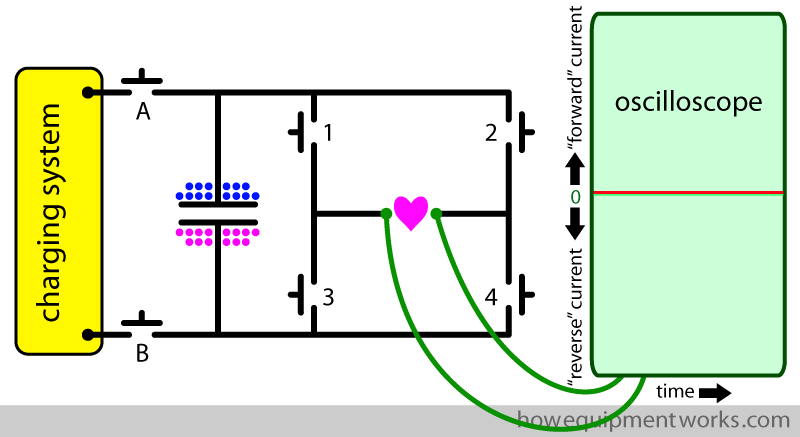
To make my diagrams less cluttered, I won’t be showing the wires between the heart and oscilloscope anymore.
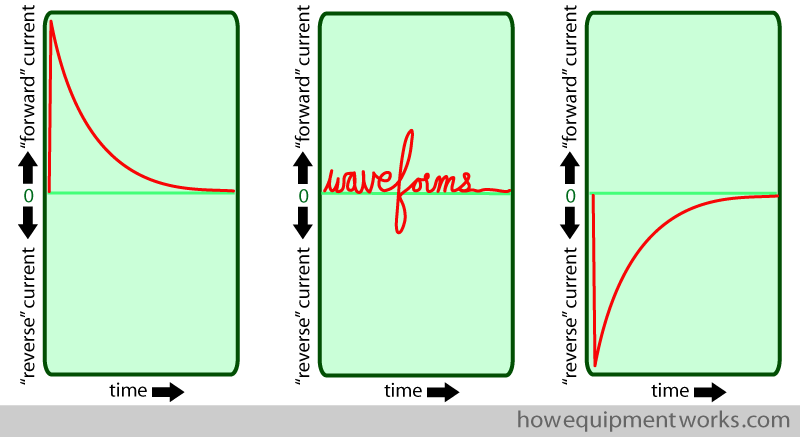
The tracing on an oscilloscope showing the defibrillation current over time can be called the “waveform”.
Basic discharge waveform of a capacitor
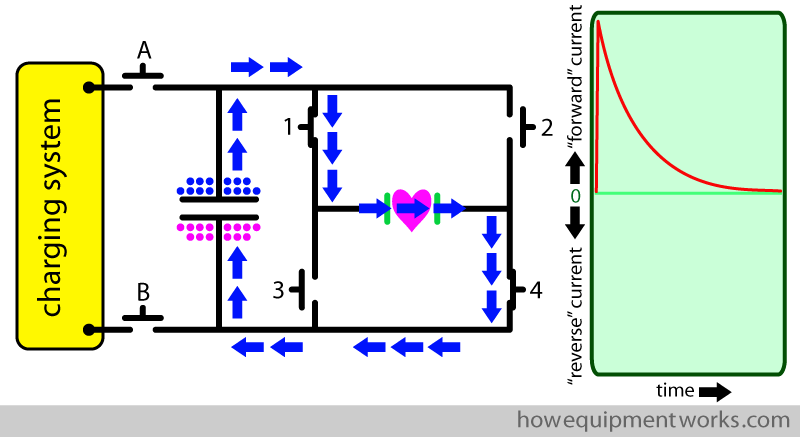
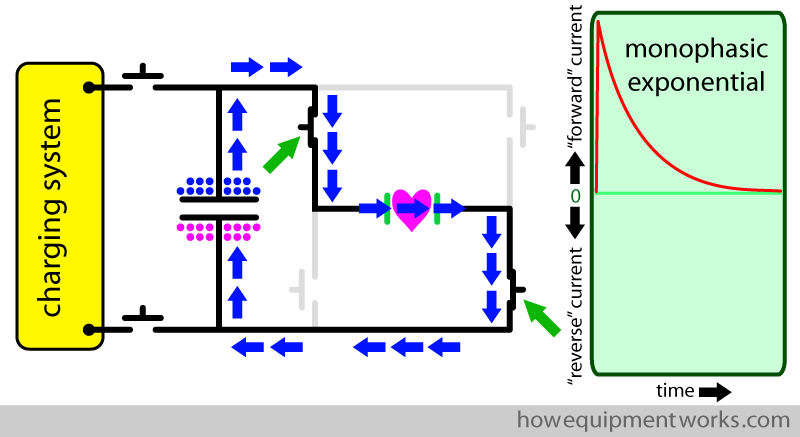
As you may recall, for the capacitor to discharge, the electrons (negative charges) need a path to flow from one plate of the capacitor to the other plate of the capacitor. We can create this pathway by switching “ON” switches 1 and 4. The capacitor now discharges via the pathway shown by the blue arrows. The oscilloscope waveform shows that initially, the discharge current flow is high and that it then decreases over time. This is a typical waveform seen during the discharge of a capacitor.
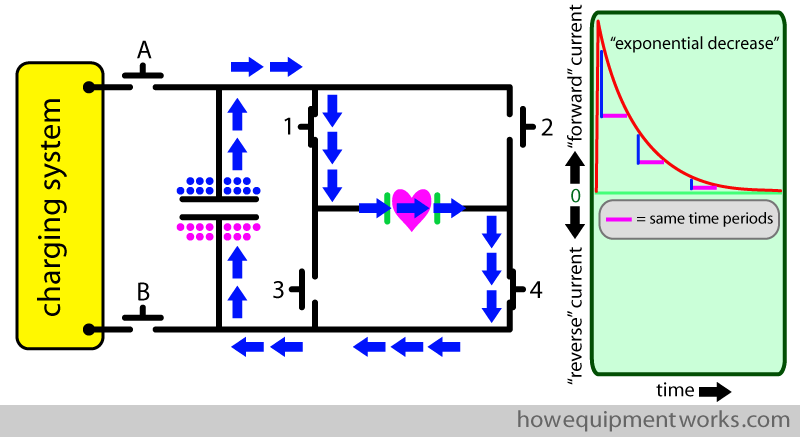
Let us look at the waveform in more detail. When a capacitor discharges, the current flow over time decreases in what is called an “exponential” way. When a current decreases in an exponential way, the rate of the decrease (i.e. how much current decreases over a given time period) is proportional to the current flow at that time. The oscilloscope below demonstrates the exponential decrease of the current from the capacitor. The pink horizontal bars represent equal time periods. You can see that for these same time periods (pink bars), the rate of decrease (vertical blue lines) decreases over time. When the current flow was high (i.e. at the start of the graph) the rate of decrease was high (tall blue line), whereas when the current flow was low(i.e. towards the end of the graph), the rate of decrease was low (short blue line). Unfortunately, it is beyond the scope of this website to explain “exponential” decreases in more detail. If you are interested (it is an important concept in engineering and medicine), there is plenty of material online regarding it (type the words “exponential decay” into Google).
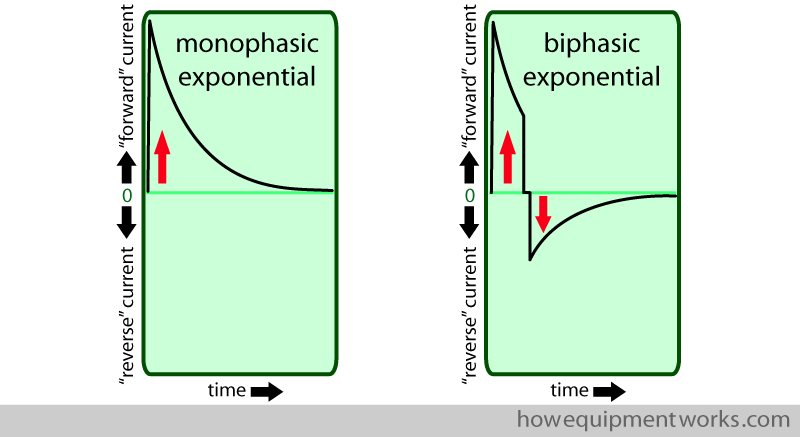
“Monophasic” waveform
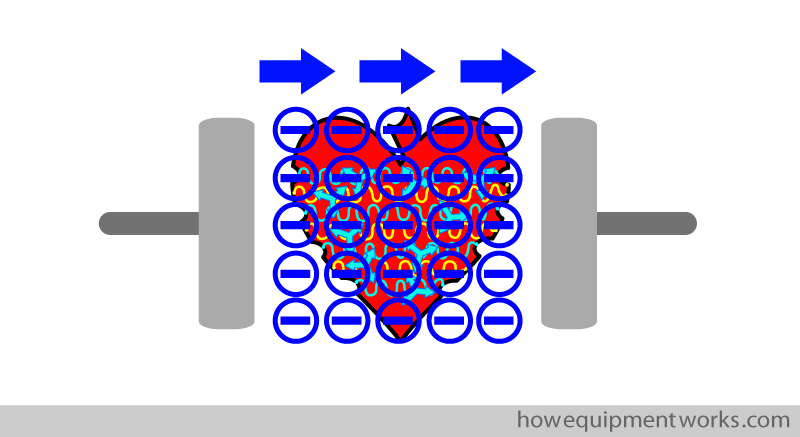
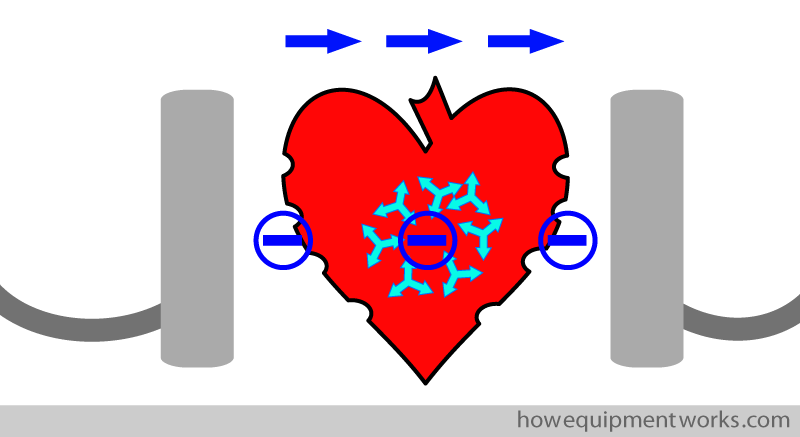
I will soon explain to you what a “monophasic” waveform is. The word monophasic relates to the “direction” of current flow. As you see below, at a given moment, the current can travel in one of two directions through the heart. I will call current that goes from your left to your right as “forward current”. And similarly, I will call current that goes the other way, “reverse current”.
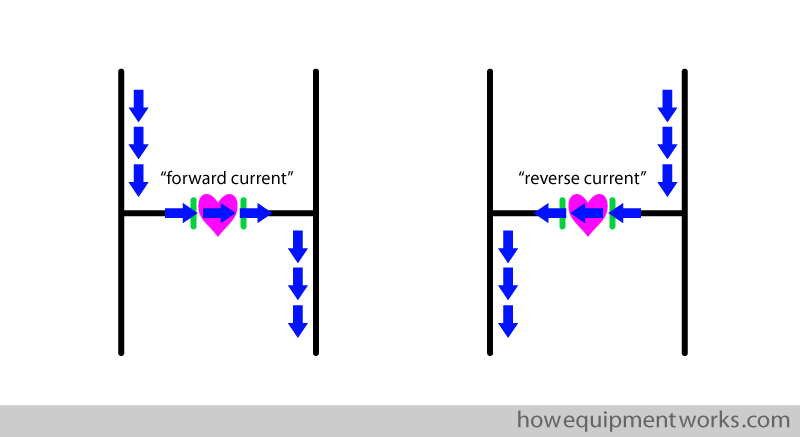
The oscilloscope can, in addition to showing us the magnitude of current flow over time, also show the “direction” of current flow over time. In the example below, you can see that the current flow is “forwards”. In our oscilloscope, the “forward” current flow is shown by the waveform going upwards.
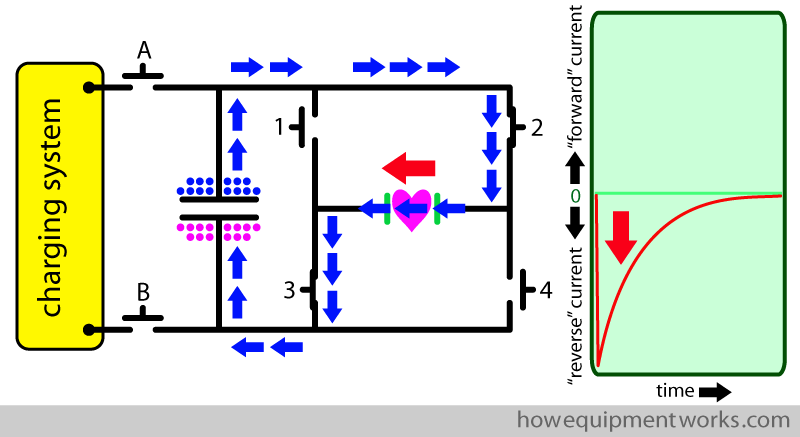
Let me now show you how the oscilloscope waveform looks when the current is made to go through the heart in the reverse direction. We can make the current go in the reverse direction by discharging the capacitor through different switches to those that we used before. This time we put “ON” switches 2 and 3. As you can see below, this makes the current flow in the reverse direction. The oscilloscope shows this reverse direction current by displaying the waveform of current in the opposite direction to before (i.e. the waveform goes below the baseline).
Let us return to our first example, where we put switches 1 and 4 “ON”, making the current go in the “forward” direction. As you saw before, this makes the oscilloscope show an exponential waveform, which as the capacitor discharges, returns to the baseline (zero). Please note that the waveform in the oscilloscope has never gone below the baseline. This tells us that, in our example, the discharge current only went in “one direction” (i.e. forwards). A waveform showing current flowing in only one direction is called a “monophasic waveform” (“mono” means one and “phasic” sort of means “direction”).
As you know, the capacitor discharge waveform is “exponential”. So, combining monophasic and exponential, this kind of waveform is called a “monophasic exponential” waveform.

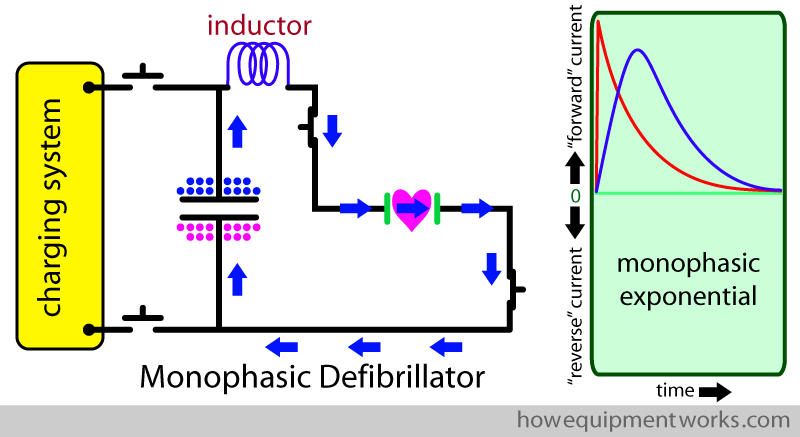
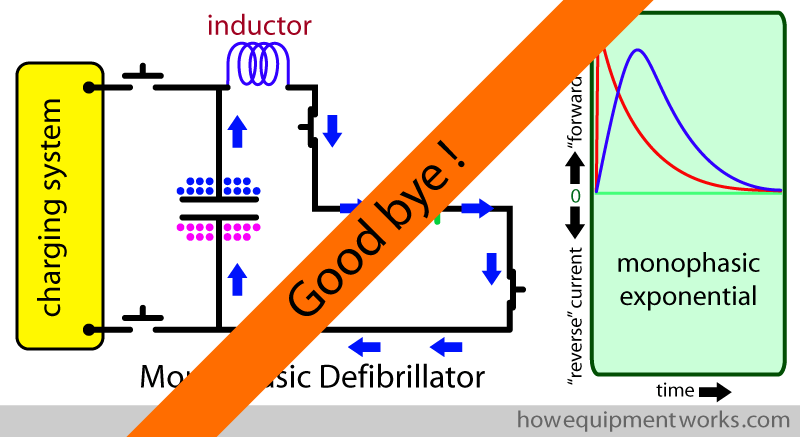
The monophasic defibrillators also had a large component called an “inductor”, a large coil of wire (shown in blue below) placed in the circuit. The inductor “slows” the current, making it have a lower peak and “spreading” it over a longer time (see blue waveform). These effects were considered good for clinical reasons. The physics concerning how inductors work is a bit complex, and I therefore won’t explain it here. Also, in newer defibrillators, called biphasic defibrillators, which I will explain soon, the inductor is no longer used.
In the past (before around 25 years ago), defibrillators were designed to produce monophasic exponential waveforms as has been explained so far. However, since then, it has been found that a different type of waveform is more effective at successfully defibrillating hearts. The newer waveforms are called “biphasic waveforms”, which essentially means that during defibrillation, the current first goes in the forward direction and then changes direction and goes in the reverse direction. An example of a biphasic waveform is shown below. I will explain to you soon about how biphasic waveforms are delivered.
I do need to give a warning to the many anaesthetists (medical personnel who put patients to sleep for surgical operations) visiting this website. Unfortunately, there may be some anaesthesia textbooks and other learning resources which only explain the old monophasic defibrillators instead of the newer biphasic defibrillators. If you come across such, please contact the author and gently suggest that it be updated. Similarly, some examination bodies may have not updated their “question bank” to include biphasic defibrillators. If you can, please try and check with them.

Do you work in the anaesthetic team? If you do, please visit the free website below, which has anaesthesia-related fun and safety material. Click the button below to visit.

Biphasic defibrillator
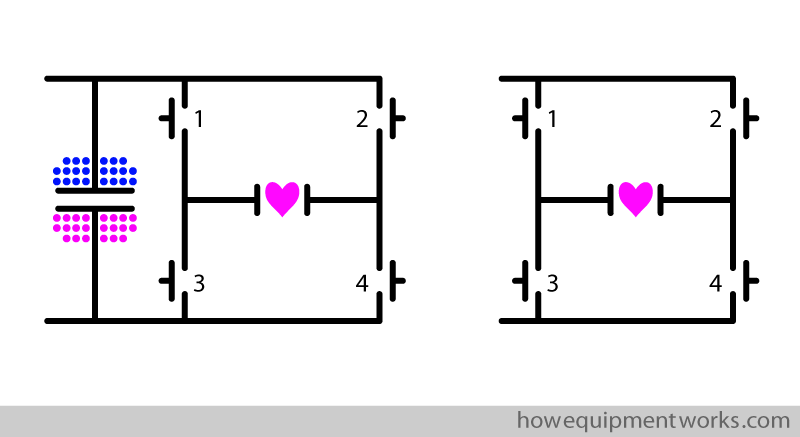
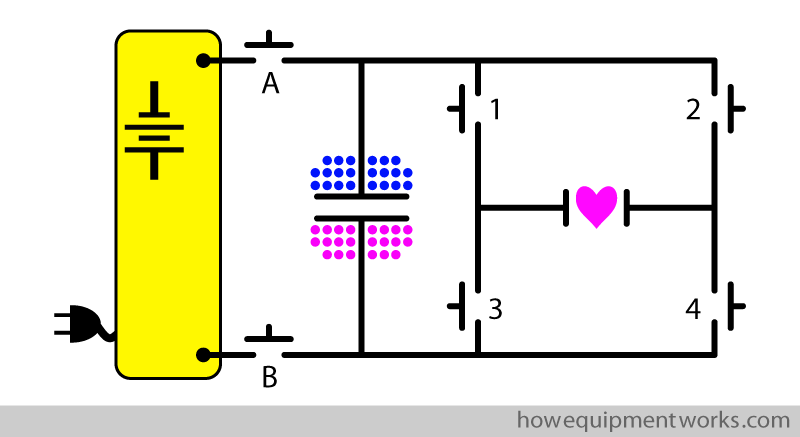
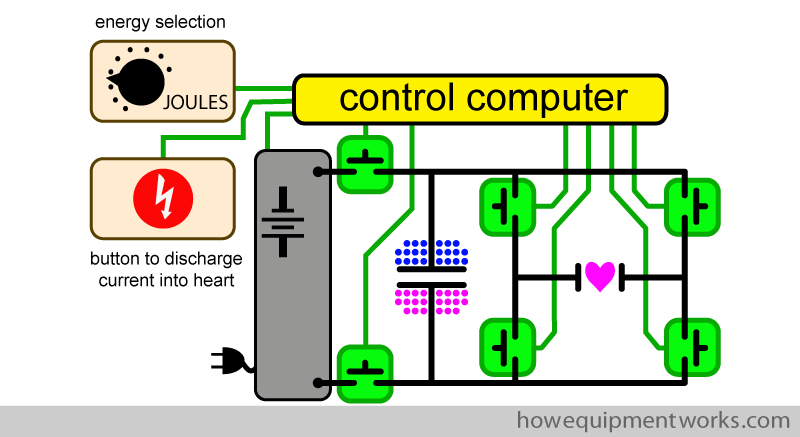
Let us now learn about how the modern biphasic defibrillator works. The old monophasic defibrillators, you have so far read about, had only two discharge switches (green arrows). The biphasic defibrillator circuit just has some additional wires and switches (shown in grey below). I will of course explain it to you soon.
The charging system of the biphasic defibrillator is very similar to the monophasic defibrillator, so I won’t repeat how it works here.
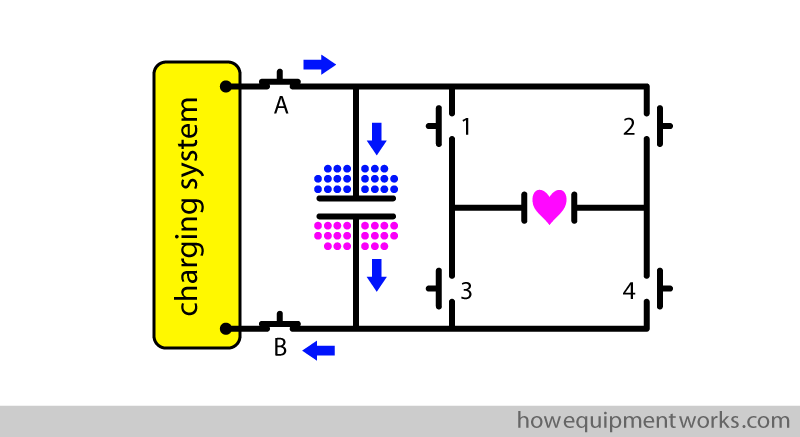
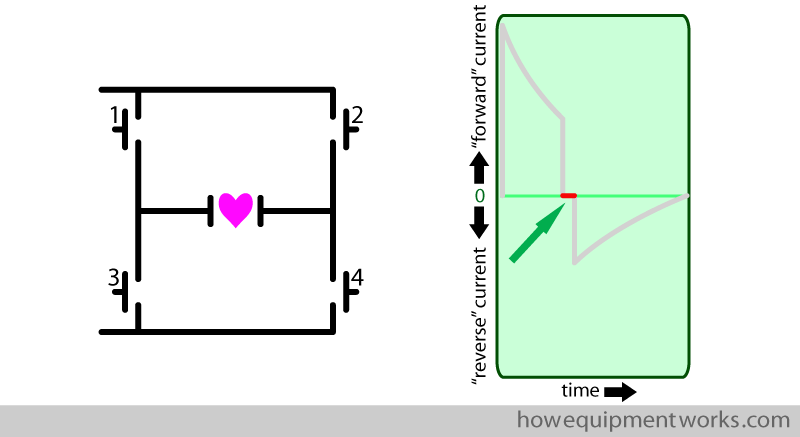
To simplify things and to make room for clearer diagrams, at times I will not show you the charging part of the circuit at all. If space is very tight, I may even omit showing the capacitor. So even when not shown, please always assume that there is a correctly charged capacitor. Also note that unlike the monophasic defibrillator, which had two switches, the biphasic defibrillator has 4 switches, which I have numbered. When describing how these switches function, I will refer to these numbers.
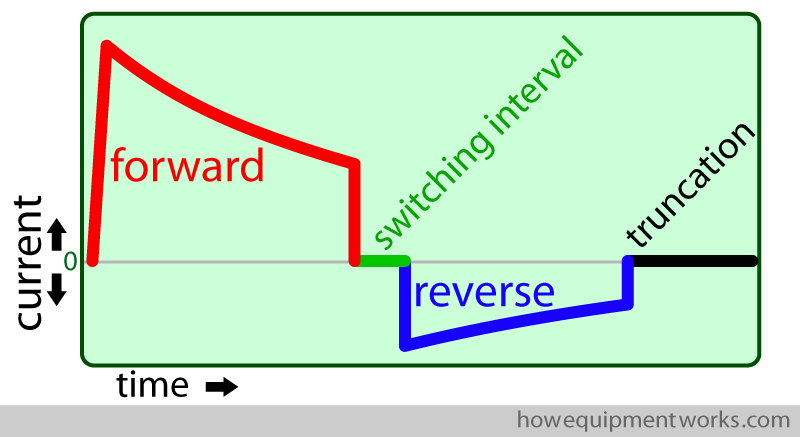
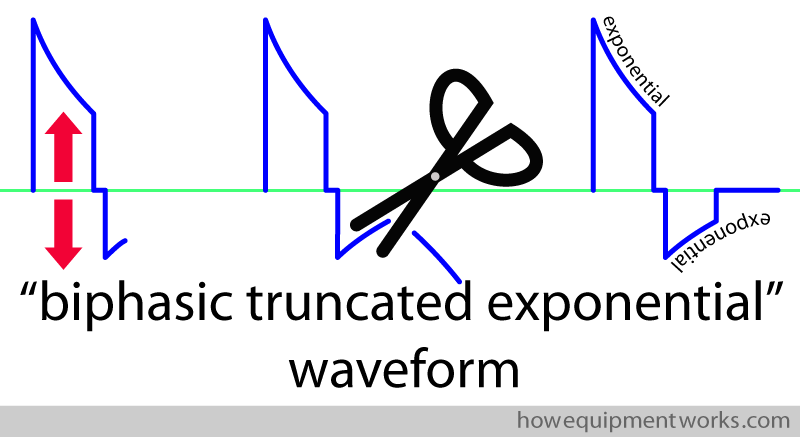
We are now ready to learn how the biphasic waveform is created in modern defibrillators. In the image below, I have enlarged the biphasic waveform. To simplify my explanations to you, I have divided it into four parts and, as shown below, have given each part of the waveform a name. The waveform may look complicated to some of you, but please do not worry. Once you understand it, you will be able to draw it easily. In the next sections, I will explain to you how each segment of the waveform is created by the defibrillator.
Forward current part of the biphasic waveform
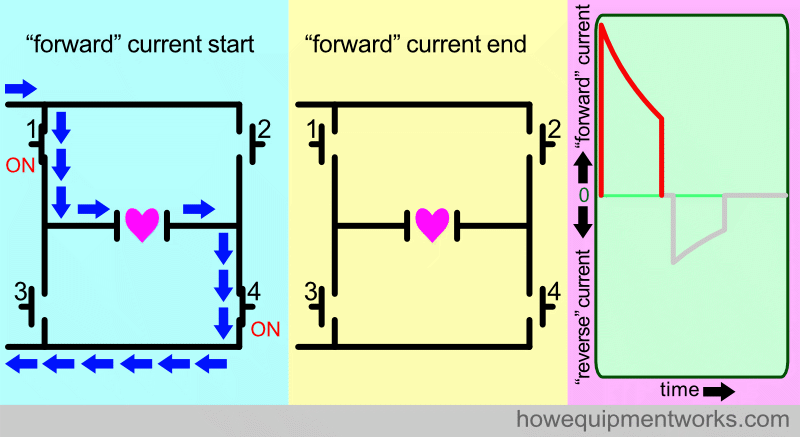
The biphasic defibrillator starts by sending current through the heart in the “forward” direction. This is done in a similar way to how the monophasic defibrillator delivers current to the heart. i.e. switches 1 and 4 are put “ON”. However, there is a crucial difference. In the case of the biphasic defibrillator, these two switches are switched “OFF” before the capacitor has finished discharging. When these switches are switched “OFF”, the current flow to the heart stops and the oscilloscope tracing returns to the baseline (zero). However, the capacitor still has some charge left in it, as was prevented from emptying completely.
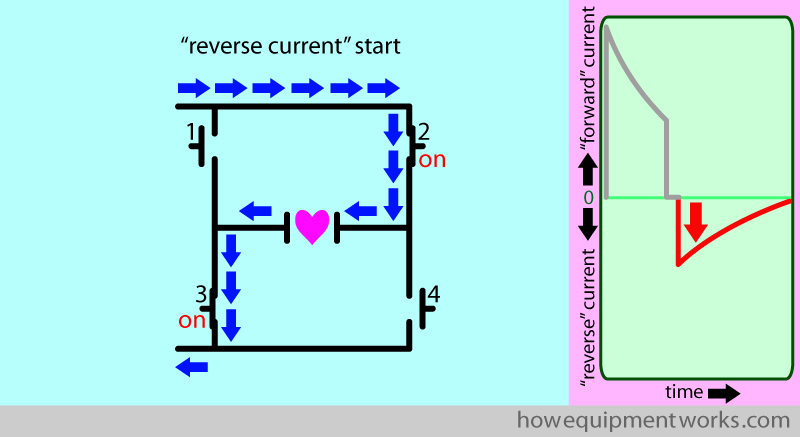
“Reverse current”
As you saw previously, the forward current was stopped by switching “OFF” switches 1 and 4. The biphasic defibrillator now needs to “reverse” the direction of the current flow to the heart. It does this by switching “ON” switches 2 and 3, which as you can see below, makes the current go in the reverse direction in the heart. The oscilloscope shows the reverse current by making the graph go below the baseline.

However, if you look carefully, you will see that there is a brief period between the forward current and reverse current, where the oscilloscope graph shows no current flow. In the magnified oscilloscope graph shown below, you can see this brief period as a short red line on the baseline (zero). I call this time period the “switching interval” and will explain to you why it is there.

The switching interval starts when the “forward current” switches (1 and 4) are switched “OFF” and ends when the “reverse current” switches (2 and 3) are switched “ON”. During the switching interval”, all four switches are in the “OFF” position. The “switching interval” is something that has been deliberately added by the designers of defibrillators. The switching interval provides adequate time for the “forward” current switches (1 & 4) to first “properly” switch “OFF” before the “reverse” current switches (2 & 3) are put “ON”.
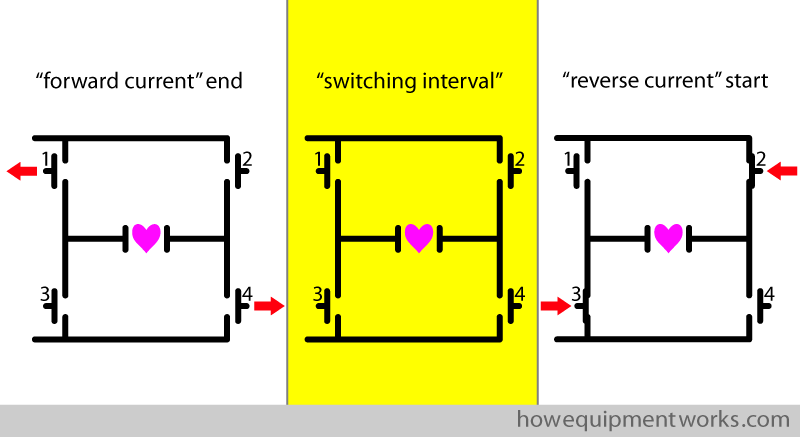
In defibrillators, the switches are electronically controlled and operate at very high speeds. Therefore they need only a brief “switching interval” between the end of the forward current and the start of the reverse current. That is why you only see a brief “switching interval” on the oscilloscope (green arrow and short red line).
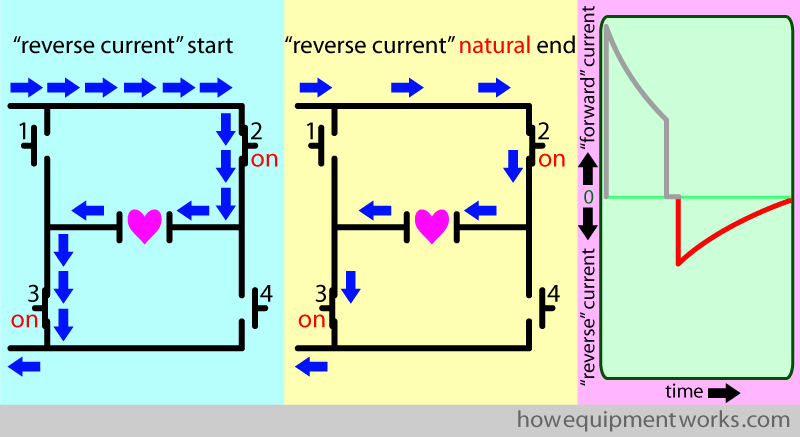
Let us now return our attention to the “reverse current”. As you saw before, to give the heart the “reverse current”, switches 2 and 3 are switched “ON”. The reverse current makes the oscilloscope graph go below the baseline (red arrow).
In the diagram below, I have named the end of the reverse current as the “reverse current natural end”. What I mean is, this is how the waveform would look like if we let the capacitor completely discharge into the heart, without us doing anything more to the switches. In this situation, as demonstrated below, the waveform shows that the reverse current gradually decreases and eventually becomes zero. As I will explain later, in real life, we manipulate the switches and prevent the reverse current from ending in a “natural” way.
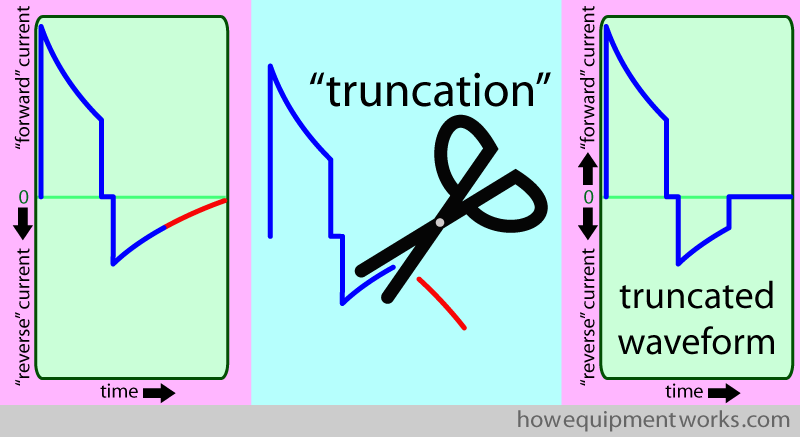
“Truncation”
As mentioned before, if we don’t change any switches, the “reverse current” returns to the baseline “gradually” (see red arrows). Unfortunately, as I will explain to you, this “gradual” decrease at the end of the waveform is problematic.

You will remember from our discussion on the basics of defibrillation that the defibrillation current needs to be large to be effective.
Conversely, if a small current is used in defibrillation, a rather dangerous effect may occur. A small current may actually cause fibrillation in the heart! The mechanism of how this happens is unfortunately beyond the scope of this website.
So, from a defibrillation point of view, we need to use reasonably large currents to have effective defibrillation and we also need to avoid small currents that can cause fibrillation. Keeping these in mind, let us look at the biphasic waveform. You can see in the example below, that the “forward current” and most of the “reverse current” is large and therefore good for defibrillation. However, the tail end (shown in red) of the “reverse current” is small and as discussed, has the potential to fibrillate the heart. i.e. the low current at the tail end of the waveform has the potential to cause fibrillation in the heart that has just been defibrillated by the earlier high current part of the waveform. Therefore, the defibrillator needs to avoid giving a low current tail to the patient.

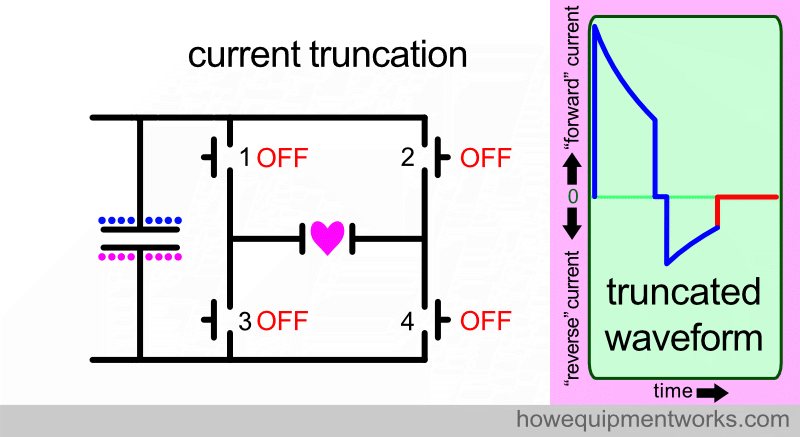
To avoid the problem we discussed, the defibrillator “cuts off” the harmful tail end of the biphasic waveform. The “official” term used to describe this “cutting” is called “truncation”. Once the waveform tail end is cut, it is called a “truncated waveform”. I will next explain how the waveform truncation done.
The way the defibrillators truncate the reverse current in real life is very complex. I think a fair simplification is to imagine that the truncation happens by all four switches switching to the off position. This abruptly stops the current flowing into the patient.
Summary of biphasic defibrillator sequence
Let us at this point summarise the sequence of events that happen when we use the biphasic defibrillator:
- To provide the necessary large current for defibrillation, we need to charge the capacitor. The charging system can use battery current or current from a wall socket. Charging switches A and B are switched “ON” and the capacitor is charged using a high-voltage DC current. Once charged to the required level, switches A and B are switched “OFF”.
- For the “forward current”, switches 1 and 4 are switched “ON”, and then switched off.
- There is a brief “switching interval” where all switches are “OFF”.
- The “reverse current” is started by switching “ON” switches 2 and 3.
- The “reverse current” is then stopped (truncated) by switching all switches OFF.
In real life, the charging system and the internal switches of the defibrillator are electronically controlled by a computer. The user selects the required energy and the computer controls the charging system to charge the capacitor. When appropriate, the user presses the button to deliver the current to the patient. The computer then controls the four high-speed electronic switches to deliver the biphasic defibrillation current.
Throughout our discussion, we have “seen” the current flow as a biphasic waveform on an oscilloscope. However, keep in mind that in real life, the defibrillation current flows via pads placed on the patient’s chest. The biphasic current goes through the heart first in one direction and then changes direction to go the other way. (Also in real life, the patient wouldn’t be smiling as shown in the image below!)
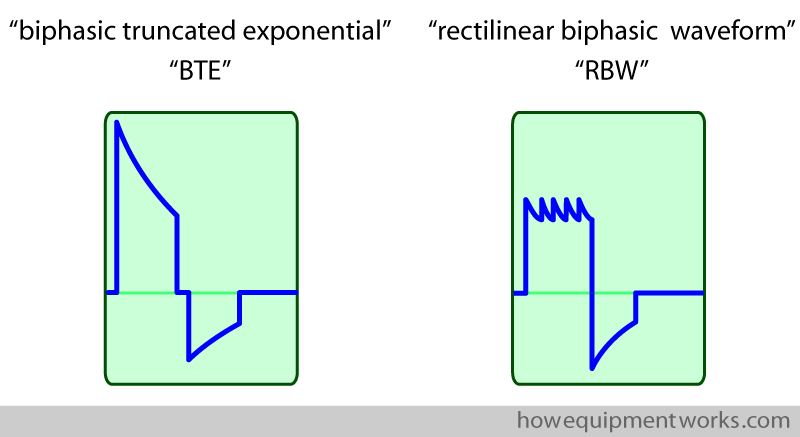
By the way, the biphasic waveform that we have so far studied is “officially” called “biphasic truncated exponential” waveform, often the name being shortened to “BTE” waveform.
The biphasic truncated exponential (BTE) waveform is not the only waveform that is currently in use. There are other biphasic waveforms, such as one called “Rectilinear Biphasic Waveform” (RBW), which I have shown below. Unfortunately, it is beyond the scope of this website to discuss which waveform is medically more effective at defibrillating the heart. You can get information about various waveforms elsewhere on the internet.
Automated External Defibrillator (AED)
The success of defibrillation is highly dependent on how soon after fibrillation the defibrillation current is given. Literally, every second counts.
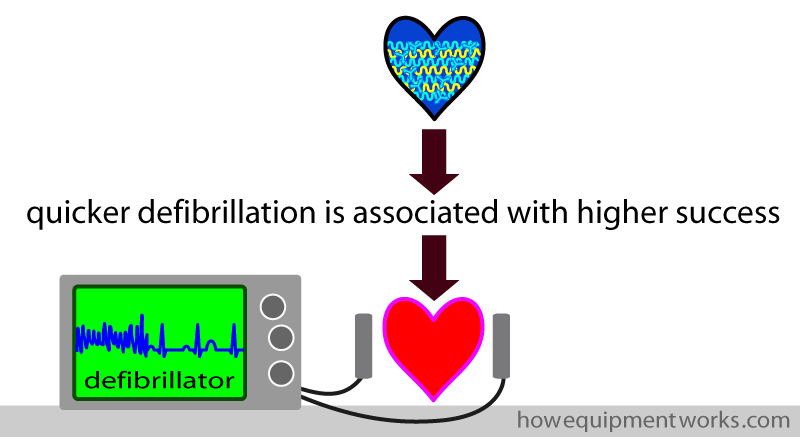
In the past, if someone had ventricular fibrillation in a non-hospital setting, there was a considerable delay before an ambulance with trained medical personnel and a defibrillator would arrive. To reduce the delay before defibrillation, there is a move to place defibrillators in public places, workplaces, schools, etc. Such defibrillators are specially designed to be easy to use by the public and are called “public access defibrillators”. They are also called “automatic external defibrillators” (AED).
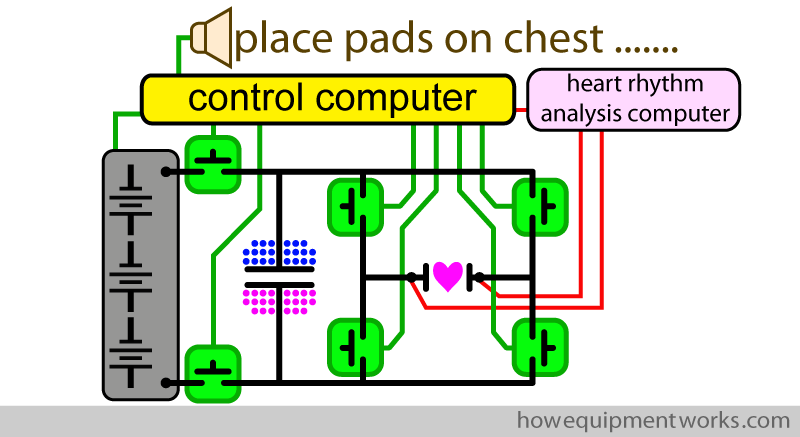
If someone is suspected of having ventricular fibrillation (i.e. cardiac arrest), a member of the public can take a nearby public access defibrillator and follow its instructions. The defibrillator comes with two pads attached to wires. The instructions will show where to stick the two pads onto the patient. The AED, using an electronic voice, will also guide the members of the public about what to do.
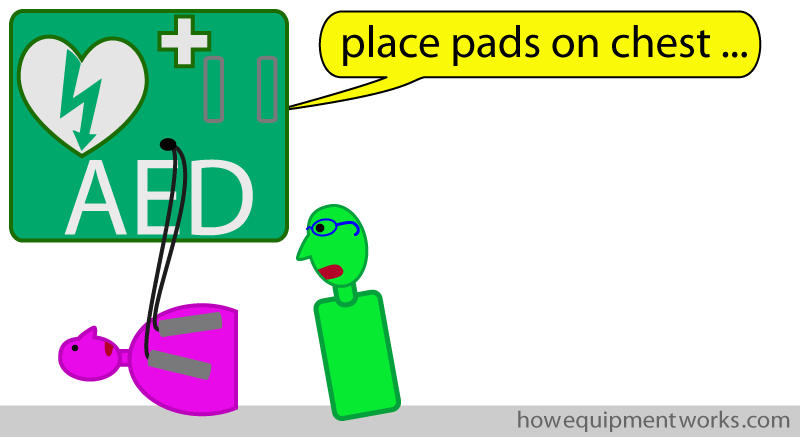
Once connected to the patient, the AED analyses the heart rhythm (it is a very clever piece of equipment) and delivers a defibrillation current if it detects that the patient has ventricular fibrillation. I cannot go into details of the various AED devices, but you can see plenty of videos on the internet showing how they are used. Also, please find out, in places where you visit often, where the AEDs are located. Someday, that information may save someone’s life!
The basic design of the AED is very similar to the circuits we have discussed so far. However, there are design differences between AEDs and hospital-based defibrillators and it is beyond the scope of this website to discuss them in detail. For example, AEDs have computer systems to analyse and diagnose ventricular fibrillation. They also need circuits to produce the “voice” that guides the members of the public in helping the patient. As the AEDs may be placed in all sorts of places, they often rely on long-lasting batteries and need to be made quite physically strong.
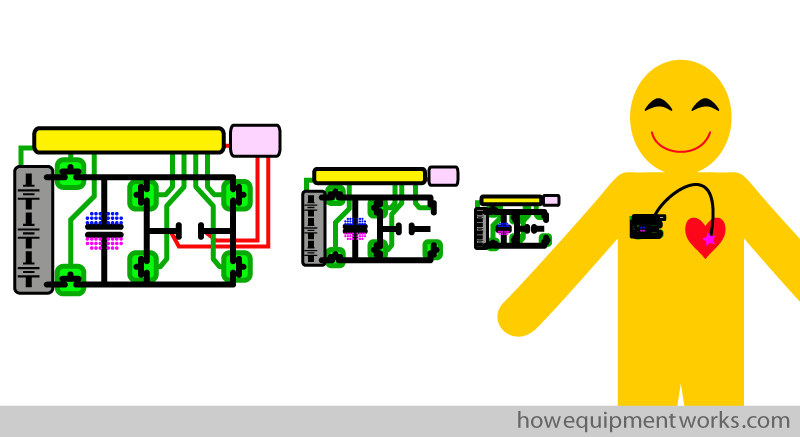
Implantable Cardioverter Device (ICD)
Finally, I would like to briefly mention that there are devices called “implantable cardioverter devices”, more commonly known as “ICDs”. These are essentially like the AEDs we just talked about, except that the device is made extremely compact. Some people have heart conditions that make them more likely to get ventricular fibrillation and other life-threatening rhythm problems in their hearts. In these patients, one option is to place an ICD inside the body and permanently connect it to the heart. The ICD continuously analyses the heart rhythm and delivers a defibrillation current when necessary. Needless to say, putting all that circuitry into something so tiny is an engineering miracle.
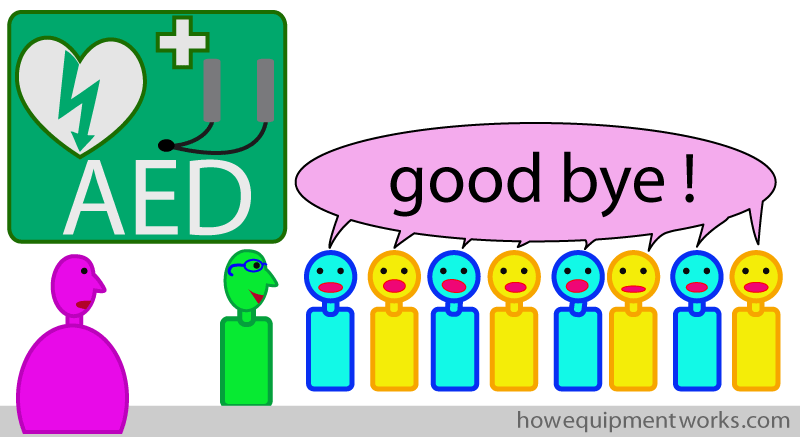
We have now reached the end of our discussion on how defibrillators work. I hope you have enjoyed it and please remember to tell your colleagues to visit this website! Thank you and goodbye.

Hello! My name is Pras, and I am the author of this website. I have made the website completely free to access so that people from all over the world can benefit from it.
If you can afford it, I would be very grateful if you would consider making a single donation of one dollar (or the equivalent in your currency) to help cover the expenses needed to run this website (e.g. for special software and computers). For this website to survive, donations are desperately needed. Sadly, without donations, this website may have to be closed down.
Unfortunately, perhaps because many people think that someone else will donate, this website gets only very few donations. If you are able to, please consider making a single donation equivalent to one dollar. With support from people like you, I am sure this educational website will continue to survive and grow. Thank you very much for your support.